The culprit? Harsh jobsite conditions expose hydraulic systems to constant contamination from dust, dirt, and moisture. Heavy loads create extreme pressure cycles that wear seals and damage components. Neglected maintenance allows small issues to cascade into catastrophic failures. Understanding how to properly diagnose, repair, and prevent hydraulic problems isn't just a maintenance skill—it's essential for protecting your equipment investment and keeping projects on schedule.
This guide walks you through identifying common hydraulic problems, confirming root causes, executing targeted repairs, making smart fix-versus-replace decisions, and knowing when professional help is needed.
Key Takeaways
- Worn seals, contamination, overheating, and pump wear cause most hydraulic failures
- Repair minor seal leaks; replace pumps with catastrophic damage or widespread contamination
- Identify symptoms, confirm root cause, execute fix, then test under load
- Call professionals for pump rebuilds, valve overhauls, contamination flushes, or safety-critical repairs
What Is a Hydraulic System in Construction Machinery?
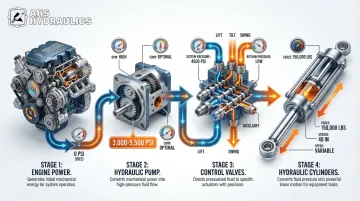
Hydraulic systems function as the muscle of construction equipment, converting engine power into controlled mechanical force. An engine-driven pump pressurizes hydraulic fluid to extreme levels—typically 3,000 to 5,500 PSI in modern excavators.
This pressurized fluid flows through control valves that direct it to hydraulic cylinders (actuators), where fluid pressure converts back into linear force capable of lifting tons or pushing through compacted soil.
Construction equipment hydraulics work in brutal conditions that industrial systems never face:
- Excavators dig through abrasive soil and rock
- Dozers push against immovable obstacles
- Systems endure temperature extremes from -20°F to 120°F
- Constant vibration loosens connections
- Contamination from dust, dirt, and moisture
These harsh operating environments demand regular maintenance and occasional repair to maintain performance and prevent costly failures.
Common Problems With Hydraulic Systems
Most hydraulic failures in construction equipment follow predictable patterns tied to component wear, fluid contamination, or operational stress. Recognizing symptoms early allows you to address problems before they escalate.
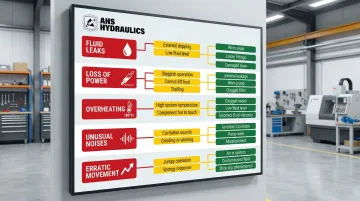
The five most common issues fall into distinct diagnostic categories, each with recognizable symptoms and typical root causes.
Hydraulic Fluid Leaks
Symptoms you'll notice:
- Visible oil puddles beneath parked equipment
- Wet spots or dripping from hoses and fittings
- Steadily dropping fluid levels requiring frequent top-offs
- Gradual loss of system pressure during operation
Likely causes:
- Worn or damaged rod seals allowing fluid past cylinder rods
- Cracked or abraded hydraulic hoses from rubbing or age
- Loose fittings that vibrated free during operation
- Scored cylinder rods that prevent proper seal contact
Loss of Power or Slow Operation
When your equipment loses its usual responsiveness, the problem typically traces back to either fluid supply issues or component wear.
Symptoms you'll notice:
- Sluggish cylinder movement that delays work cycles
- Reduced lifting capacity compared to normal performance
- Delayed response when activating controls
- Weak digging or pushing force under load
Likely causes:
- Low fluid level starving the pump
- Clogged filters restricting flow
- Worn pump unable to generate full pressure
- Internal cylinder leakage bypassing pressure
- Incorrect fluid viscosity for operating temperature
Overheating
Thermal problems accelerate system wear and can lead to catastrophic failure if ignored. Watch for these warning signs:
Key indicators:
- Fluid temperature gauges reading above 180°F (82°C)
- Burnt oil smell during or after operation
- Thermal protection shutdowns interrupting work
- Declining performance as temperature rises
Likely causes:
- Overworking the system beyond rated capacity
- Blocked or dirty hydraulic coolers
- Low fluid level reducing heat dissipation capacity
- Contaminated fluid losing thermal properties
- Failing pump generating excessive heat from internal friction
Unusual Noises (Whining, Knocking, Cavitation)
Symptoms you'll notice:
- High-pitched whining from the pump area
- Banging or knocking sounds during cylinder movement
- Grinding or rattling noises under load
- "Gravel" or "marbles" sound indicating cavitation
Likely causes:
- Air entrainment in the system (cavitation)
- Critically low fluid level
- Damaged pump bearings or worn gears
- Loose mounting bolts or components
Erratic or Jerky Movements
What you'll observe:
- Inconsistent cylinder speed during operation
- Stuttering or hesitating motion
- Loss of precise control
- Unpredictable equipment behavior
Common culprits:
- Air contamination creating compressibility
- Sticking control valves
- Worn cylinder seals allowing internal bypass
- Control system malfunctions
Why Hydraulic Systems Fail (Root Causes)
Construction equipment hydraulic systems face unique stresses compared to stationary industrial applications. Understanding root causes helps you prevent repeat failures.
Operational stress factors:
- Constant heavy loads at or near maximum capacity
- High-cycle usage with thousands of operations per shift
- Shock loading from rough terrain and sudden impacts
- Extreme pressure spikes during heavy lifting or digging
Environmental exposure:
- Dirt and dust infiltration through worn seals
- Mud and water contamination at jobsites
- Temperature extremes from freezing mornings to afternoon heat
- Abrasive particles entering through breather caps
Improper maintenance:
- Neglected fluid changes allowing contamination buildup
- Dirty filters that bypass contaminants when clogged
- Ignored early warning signs like minor leaks or noise
- Using incorrect fluid types or viscosity grades
The Financial Impact of Hydraulic Failures
These root causes create a domino effect. Industry data shows that fluid contamination causes 32% of all hydraulic failures and contributes to 85% of premature component wear.
When left unaddressed, minor problems cascade: a small leak drops fluid levels, causing pump cavitation, which generates metal particles, contaminating the entire system. The result? Catastrophic system failures costing $75,000 to $145,000 for complete replacement.
The true cost extends beyond repair bills:
- Downtime losses of $150 to $400 per hour for mid-to-large excavators
- Lost productivity during extended repair periods
- Safety risks from uncontrolled movements or component ruptures
- Potential injury liability when failures endanger operators and ground personnel

How to Fix Hydraulic System Problems (Step-by-Step)
Attempting repairs without proper diagnosis wastes time and money while risking repeat failures. This structured approach ensures you identify the correct problem, apply the right fix, and validate lasting solutions.
Step 1: Identify the Exact Problem
Visual inspection checklist:
- Check fluid level and condition (color, smell, visible contamination)
- Inspect all hoses for cracks, abrasion, or wet spots
- Examine cylinder rods for scoring, pitting, or wetness
- Look for loose or damaged fittings
- Note any visible leaks or puddles
Operational assessment:
- Document when problems occur (startup, under load, specific functions)
- Listen for abnormal sounds (whining, knocking, grinding)
- Monitor fluid temperature during operation
- Test all functions (lifting, lowering, swinging, tilting)
- Use pressure gauges to measure system pressure against specifications
Performance baseline:
- Compare current cycle times to normal operation
- Note any loss of force or speed
- Check for inconsistent or jerky movements
Step 2: Confirm the Root Cause Category
Before ordering parts or starting disassembly, determine whether your issue stems from mechanical wear, contamination, hydraulic problems, or operational factors.
Mechanical issues:
- Worn seals causing leakage
- Damaged cylinders with scored rods
- Failed pump bearings or worn gears
- Cracked or damaged hoses
Contamination-related problems:
- Dirty fluid with visible particles
- Clogged filters restricting flow
- Water contamination from failed seals
- Metal particles indicating component wear
Hydraulic system issues:
- Incorrect pressure settings
- Flow restrictions from undersized lines
- Valve malfunctions or sticking
- Air in the system
Operational factors:
- Overloading beyond rated capacity
- Incorrect fluid type or viscosity
- Ambient temperature extremes
- Power source problems
Critical rule: Treat root causes, not symptoms. Replacing a leaking hose without determining why it failed leads to repeat failures. If contamination damaged your pump, flushing the system prevents the replacement pump from failing the same way.
Step 3: Execute the Repair Based on Problem Type
Repair actions vary entirely based on your diagnosis. This is where proper identification pays off with targeted, effective fixes.
Repairing Leaks and Seal Failures
Hydraulic hose leaks:
- Identify the damaged section
- Measure hose size (inside diameter) and fitting types
- Source replacement hose rated for system pressure (minimum 3,000 PSI for most construction equipment)
- Cut to proper length and install fittings
- Torque fittings to specification (use torque wrench, not "feel")
Torque specifications for common fittings:
| Fitting Type | Size | Torque Spec |
|---|---|---|
| JIC 37° flare | -4 (1/4") | 10-11 ft-lbs |
| JIC 37° flare | -8 (1/2") | 34-38 ft-lbs |
| Flat-face O-ring (ORFS) | -8 | 43-54 Nm |
Cylinder seal leaks:
- Relieve all system pressure before disassembly
- Remove cylinder from equipment
- Disassemble carefully, noting component order
- Replace worn rod seals, piston seals, and backup rings
- Inspect rod for scoring (polish light marks; replace deeply scored rods)
- Clean all components thoroughly
- Lubricate seals with hydraulic fluid during installation
Fitting leaks:
- Clean threads completely
- Apply appropriate thread sealant (avoid Teflon tape on hydraulic fittings)
- Torque to manufacturer specifications using a torque wrench
Replacement parts must match your system's pressure ratings and specifications exactly. For cylinder rebuilds, components from manufacturers like HydraWolf Hydraulics offer precise tolerances and pressure ratings verified for heavy machinery applications, reducing the risk of premature failure from improperly sized seals or off-spec materials.
Addressing Contamination and Fluid Problems
Contamination reduces hydraulic efficiency by 25-40% before causing outright failure. Proper cleanup prevents cascading damage.
Contamination cleanup procedure:
- Drain all contaminated fluid from reservoir and cylinders
- Remove and inspect filters (metal particles indicate wear; water indicates seal failure)
- Replace all filters with high-efficiency units
- For heavy contamination, flush the system with temporary 3-micron filters and clean fluid until analysis confirms ISO 18/16/13 or better
- Refill with manufacturer-specified hydraulic fluid at correct viscosity
- Bleed air from system (see air removal section below)
Critical note: New hydraulic oil often tests at ISO 20/18/15—dirtier than required operating specs. Filter new fluid before adding it to your system.
Diagnosing Pump and Valve Failures
Pump issues require professional assessment:
- Check for unusual noise (whining indicates cavitation or bearing wear)
- Measure output pressure against specifications
- Inspect suction lines for restrictions
- Professional pump rebuilds or replacements typically required
Valve problems:
- Remove and disassemble valve assembly
- Clean all components with hydraulic cleaning solvent
- Inspect valve spools for scoring or wear
- Replace worn components
- Verify spring tension and pressure relief settings
- Test operation before reinstalling
Pressure relief valve testing:
- Connect pressure gauge to test port
- Stall system to force relief valve to open
- Compare measured pressure to specifications (typically 5,075-5,510 PSI for excavators)
- Adjust or replace if pressure deviates more than 100 PSI from spec
Removing Air from the System
Air creates spongy operation and accelerates component wear through cavitation damage.
Air removal procedure:
- Locate air entry points:
- Check suction line connections for tightness
- Inspect pump shaft seals
- Verify adequate fluid level
- Repair any suction-side leaks immediately
- Bleed air step by step:
- Open bleed screws on cylinder high points
- Set system pressure low (~70 PSI)
- Slowly extend and retract cylinders
- Continue until fluid flows bubble-free
- Close bleed screws and restore normal pressure
- Cycle all actuators through full range while monitoring fluid level
- Top off reservoir as needed
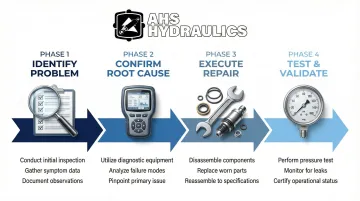
Step 4: Test and Validate the Repair
Repairs aren't complete until you've confirmed the problem is solved and won't recur.
No-load testing:
- Start equipment and let hydraulic system warm to operating temperature
- Cycle all functions slowly through full range
- Listen for unusual sounds
- Watch for leaks at repair points
- Monitor pressure and temperature gauges
Gradual load testing:
- Start with light loads and increase gradually while monitoring system pressure
- Check for proper speed and force throughout the load range
- Verify temperature stays within normal range (below 140°F optimal)
- Confirm smooth, consistent operation
Extended monitoring:
- Operate equipment for several hours or full shifts
- Inspect repair points daily for first week
- Monitor fluid level for drops indicating leaks
- Track performance to ensure problem doesn't recur
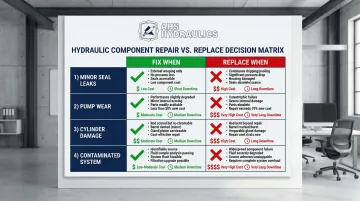
When Should You Fix vs Replace Hydraulic Components?
The fix-versus-replace decision should balance repair cost, downtime impact, component age, equipment value, and failure risk. Emergency repairs carry 150-200% cost premiums over planned maintenance, making smart decisions critical.
Scenario 1: Minor Seal Leaks or Hose Damage
Fix when:
- Seals are accessible without major disassembly
- Hoses are standard sizes available locally
- Cylinder body and rod are undamaged
- Repair cost is under 30% of replacement cost
Replace when:
- Cylinder barrel is scored internally
- Rod is bent or deeply pitted beyond repair
- Hoses require custom fabrication
- Equipment age makes finding parts difficult
Scenario 2: Hydraulic Pump Wear or Failure
Fix (rebuild) when:
- Pump has rebuildable design
- Wear is moderate (not catastrophic)
- Rebuild cost is 40-60% of new pump cost
- Downtime for rebuild is acceptable
Replace when:
- Pump has catastrophic internal damage
- Model is obsolete with limited parts availability
- Rebuild cost approaches 70%+ of new pump
- Machine is down and costing $400/hour in lost productivity
Consider OEM remanufactured pumps as a middle option. Factory-reman pumps cost 40-60% less than new while offering identical warranties and performance. For critical downtime situations, off-the-shelf reman components restore operation in 1 day versus 3-5 days for local rebuilds.
Scenario 3: Hydraulic Cylinder Damage
Fix when:
- Only seals need replacement
- Minor rod refinishing resolves scoring
- Cylinder is standard design with available parts
- Equipment downtime is flexible
Replace when:
- Cylinder rod is bent beyond straightening
- Barrel is cracked or severely scored
- Equipment is older with limited parts support
- Quality replacement cylinders from direct manufacturers offer better value than complex rebuilds
When sourcing replacement cylinders, buying direct from manufacturers like HydraWolf Hydraulics ensures correct specifications and pressure ratings for your equipment.
Their cylinders use North American materials and undergo testing for pressure, durability, and leak resistance before shipping—critical for construction applications where downtime costs hundreds per hour.
Scenario 4: Contaminated System with Multiple Component Failures
Fix when:
- Contamination caught early
- Only filters and fluid need replacement
- Components show no damage from contamination
- Proper flushing can restore cleanliness
Replace when:
- Contamination caused widespread damage
- Pump, valves, and cylinders all failed
- Metal particles circulated throughout system
- Total system replacement costs less than repairing multiple failed components
Cost perspective: Preventive maintenance costs approximately $12,000-$18,000 annually per excavator. A single major hydraulic failure averages $95,000, with severe cases reaching $145,000. Investing in prevention and making smart repair decisions protects your equipment investment.
Common Mistakes to Avoid When Repairing Hydraulic Systems
Hydraulic repairs demand precision and systematic thinking. Shortcuts and oversights can turn a simple fix into repeated failures—or worse, safety hazards. These common mistakes account for the majority of botched repair jobs.
- Replacing leaking hoses without investigating why they failed in the first place—pressure spikes, improper routing, or contamination often destroy new hoses just as quickly
- Installing components with wrong pressure ratings or incompatible seals that don't match your fluid type—parts might fit physically but fail catastrophically under operating conditions
- Declaring repairs complete without running equipment under actual load conditions or monitoring for problem recurrence over the next few cycles
- Opening hydraulic lines without relieving system pressure—fluid at 5,000+ PSI can inject through skin and cause severe injury
- Working under unsupported loads
- Skipping lockout/tagout procedures
- Neglecting proper eye and hand protection
Quality replacement components matter significantly. When sourcing parts like cylinders, seals, and fittings, verify they meet OEM specifications for pressure ratings and materials. HydraWolf Hydraulics manufactures American-made hydraulic components designed to match or exceed original equipment standards, helping operators avoid the costly mistakes that come from using substandard parts.
Preventive Measures to Avoid Future Hydraulic Failures
Preventive maintenance delivers an average ROI of 650% within 30 months by reducing failures, extending component life, and minimizing downtime.
Systematic maintenance prevents 78% of hydraulic failures and reduces hydraulic-related downtime by 75%.
Essential preventive actions include:
Regular Fluid and Filter Changes
- Normal conditions: Change hydraulic fluid every 3,000-4,000 hours
- Severe conditions (dusty jobsites): Every 2,000 hours
- Filter changes: Every 500-1,000 hours regardless of condition
- Fluid analysis programs can extend these intervals while maintaining protection
Daily Pre-Operation Inspections
- Check fluid level before starting
- Visual inspection for leaks, wet spots, or drips
- Examine hose condition for cracks or abrasion
- Verify no loose fittings or damaged components
Proper daily operation protects your hydraulic system from unnecessary stress:
- Avoid shock loading from sudden impacts
- Don't exceed rated equipment capacities
- Allow system warm-up in cold weather (cold fluid flows more slowly)
- Monitor temperature during heavy work cycles
Quality Components and Fluids
- Use manufacturer-specified hydraulic fluid for your equipment
- Source replacement parts from reliable manufacturers like HydraWolf Hydraulics, where American-made components ensure consistent quality control
- Direct-from-manufacturer sourcing provides better traceability than generic aftermarket alternatives
- Maintain detailed service logs tracking maintenance history
Finally, proper operator training prevents many failures before they start:
- Recognize early warning signs (unusual sounds, slower operation, minor leaks)
- Understand proper equipment operation
- Know when to stop work and report problems
- Follow correct startup and shutdown procedures
Conclusion
Most hydraulic system problems in construction machinery are fixable when addressed early with proper diagnosis. The key to effective, lasting repairs lies in correct root cause identification—treating symptoms without understanding underlying issues leads to repeat failures and wasted resources.
Smart fix-versus-replace decisions balance repair costs, downtime impact, and component reliability. Minor seal leaks warrant repair; catastrophic pump damage or widespread contamination often makes replacement more economical.
Knowing when to handle repairs in-house versus calling professional hydraulic service saves both money and downtime. Using quality American-made replacement components ensures repairs last, eliminating the repeated failures that come from substandard parts.
Beyond making smart repair choices, prevention remains your most cost-effective strategy. Systematic maintenance delivers measurable returns:
- Prevents the majority of hydraulic failures before they occur
- Extends component life by 45%
- Improves machine productivity by 15-25% through faster cycle times
- Reduces unplanned downtime and emergency repair costs
Frequently Asked Questions
What are the hydraulics used in construction?
Hydraulic systems power cylinders for lifting (excavator booms, loader buckets), pushing (dozer blades), and controlling attachments. Most construction equipment operates at 3,000-5,000 PSI, with heavy-lift modes exceeding 5,500 PSI.
What are the maintenance procedures for a heavy equipment hydraulic system?
Daily checks include fluid levels, visual leak inspections, and monitoring for unusual sounds or performance changes. Follow manufacturer schedules for fluid changes (every 2,000-4,000 hours) and filter replacements (every 500-1,000 hours).
How much does it cost to repair a hydraulic system?
Costs range from $200-500 for hose or seal repairs to $2,000-10,000+ for pump or cylinder rebuilds. Emergency repairs typically cost 150-200% more than planned maintenance.
How long does a hydraulic system repair typically take?
Simple repairs like hose replacement or seal kits take 2-4 hours including testing. Complex repairs such as pump rebuilds or cylinder removal and reseal require 1-3 days including diagnosis, parts procurement, repair work, and validation testing under load.
Can I repair hydraulic systems myself or do I need a professional?
Basic repairs like hose replacement, filter changes, and fluid top-offs are DIY-friendly with proper tools. Complex repairs such as pump rebuilds, valve overhauls, or system flushes require professional expertise and specialized equipment.
What are the signs that a hydraulic pump is failing?
Key symptoms include high-pitched whining, pressure loss, overheating fluid, and slow actuator movement. Cavitation sounds (like gravel rattling) indicate pump inlet problems requiring immediate attention.