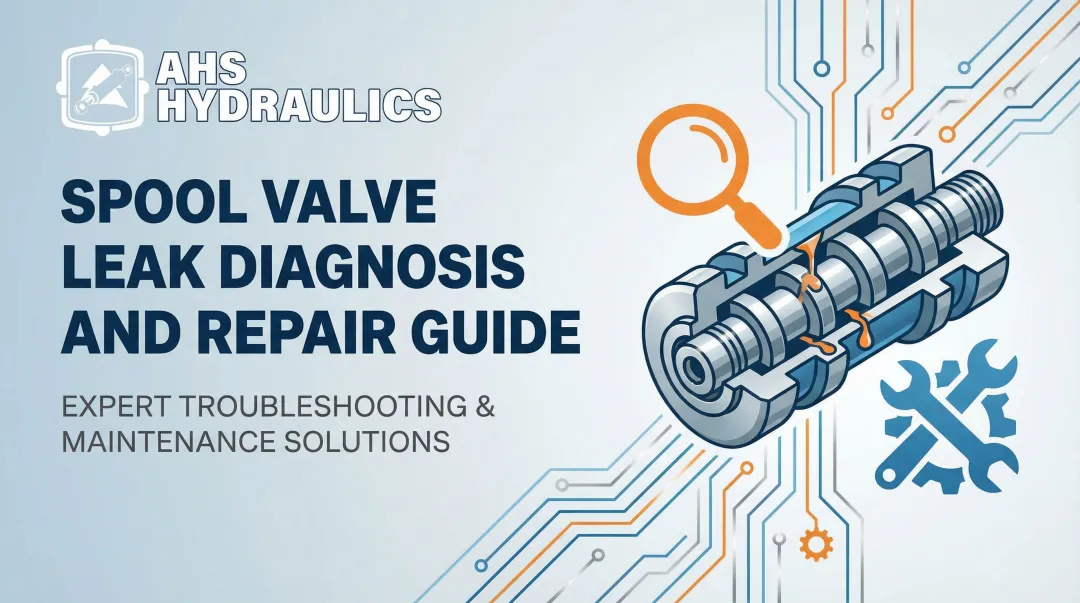
Spool valve issues rank among the most common hydraulic problems in heavy equipment. Over 80% of hydraulic system failures stem from contaminated fluid and worn seals—problems that rarely require complete valve replacement. Most operators can restore proper function with basic tools, a quality rebuild kit, and proper technique. The key is knowing when repair makes sense, which components to replace, and how to prevent repeat failures.
This guide covers identifying spool valve problems through symptoms and inspection, step-by-step repair procedures with proper torque specifications, deciding when to repair versus replace based on damage assessment, and implementing maintenance practices that extend valve life by years.
Key Takeaways
- External leaks, internal bypass, binding, and sluggish response—all repairable with proper diagnosis
- Rebuild kits cost $50-$200 versus $800-$3,000+ for replacement—saving you 85-95%
- Most spool valve repairs complete in 2-3 hours with basic tools and a rebuild kit
- Replace only when castings crack, bores score deeply, or clearances exceed 0.001 inches
What Is a Spool Valve?
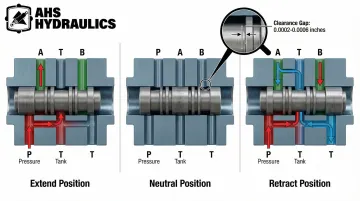
A spool valve is a directional control valve that uses a precision-machined cylindrical piston (the spool) sliding within a valve body bore to direct hydraulic fluid flow. When you move the control lever on a log splitter or loader, you're shifting the spool axially to connect pressure, tank, and work ports in different combinations—extending or retracting cylinders as needed.
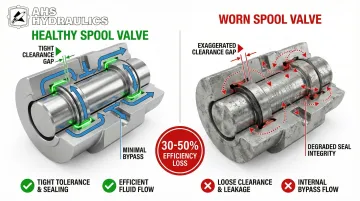
The critical engineering feature is the sealing mechanism. Most hydraulic components use elastomeric seals, but spool valves rely on extremely tight metal-to-metal tolerances between the spool lands and bore interior. Typical diametrical clearances measure just 0.0002-0.0006 inches (5-15 microns)—tighter than a human hair.
This precision lap fit controls fluid flow without elastomeric seals on the sliding surfaces themselves.
O-rings appear only at the spool ends and on static surfaces (end caps, port connections) to prevent external leakage. The dynamic sealing that directs thousands of PSI of hydraulic pressure happens through that microscopic metal-to-metal gap.
This design explains both why spool valves are so sensitive to contamination and why many failures can be fixed by replacing only the static seals and springs.
Common applications include:
- Tractors and loaders (directional control)
- Log splitters and firewood processors (cylinder actuation)
- Construction equipment (multi-function hydraulics)
- Agricultural machinery (implement control)
These control centers are critical but wear-prone components worth understanding and maintaining.
Common Problems With Spool Valves
Most spool valve failures follow predictable patterns related to seal wear, contamination, or mechanical damage. Recognizing symptoms early saves money and prevents secondary damage to pumps and cylinders.
External Leaks
Symptoms:
- Visible hydraulic fluid dripping from valve body or end caps
- Declining reservoir levels requiring frequent top-offs
- Oil stains around control lever pivots or mounting surfaces
Likely Causes:
- Failed or hardened O-rings from heat cycling
- Worn dust seals allowing contamination past static seals
- Improper torque on end cap bolts crushing or extruding seals
- Damaged gaskets between sectional valve slices
When external leaks are ruled out, internal bypass becomes the next diagnostic focus.
Internal Leaks
Symptoms:
- Cylinders moving slowly despite full engine RPM
- Cylinder drift when control lever sits in neutral position
- Gradual loss of system pressure over minutes
- Excessive heat generation at valve body
Likely Causes:
- Excessive clearance between spool and bore due to abrasive wear
- Contamination particles scoring polished surfaces
- Worn spool lands from thousands of operating cycles
Internal leakage creates a bypass path that reduces volumetric efficiency by 30-50%, forcing the pump to work harder and generating excess heat throughout the system.
Beyond leakage issues, mechanical problems often manifest as restricted spool movement.
Spool Binding/Sticking
Symptoms:
- Control lever difficult to move or requiring excessive force
- Spool fails to return to neutral when released
- Jerky, inconsistent cylinder motion
- Sudden "breakaway" movement after initial sticking
Likely Causes:
- Contaminated fluid depositing varnish on spool surfaces
- Misaligned valve mounting distorting the bore
- Overtightened end caps causing bore distortion
- Damaged or weakened centering springs
- Silt-lock from particles wedging into the radial clearance
Even when spools move freely, response delays indicate underlying system issues.
Sluggish Response
Symptoms:
- Delayed reaction time between moving lever and cylinder movement
- Gradual rather than immediate response
- Reduced maximum cylinder speed
Likely Causes:
- Low pilot pressure in pilot-operated valves
- Restricted drain port reducing return flow
- Weak centering springs failing to position spool correctly
- Excessive back pressure in return lines
Why Spool Valves Fail (Root Causes)
Understanding failure mechanisms helps prevent repeat problems after repair. Contaminated hydraulic fluid causes over 80% of hydraulic system failures, including spool valve damage. Particles as small as 5-15 microns—invisible to the naked eye—can wedge into the microscopic spool-to-bore clearance, causing immediate binding or gradual abrasive wear that widens the gap permanently.
Normal wear happens through three predictable mechanisms:
- O-rings harden from heat cycling, losing elasticity and developing compression set that prevents proper sealing
- Centering springs weaken from constant compression and extension cycles, eventually failing to return the spool to neutral reliably
- Dynamic seals flatten under sustained pressure, reducing their sealing effectiveness
Left unaddressed, these wear patterns create cascading damage:
Minor external leaks waste expensive hydraulic fluid (often $15-30 per gallon) and create environmental contamination and slip hazards.
Internal leaks slash system efficiency. A valve with worn clearances forces the pump to circulate 30-50% more fluid to achieve the same work, generating excess heat that accelerates seal aging throughout the system.
Complete valve failure causes sudden equipment shutdown, potentially creating safety hazards when cylinders lose holding pressure under load. What starts as a $75 seal replacement can escalate to a $2,000 valve replacement plus pump damage if left unaddressed.
How to Fix Spool Valves (Step-by-Step)
Proper diagnosis before disassembly is critical. Randomly replacing parts without identifying root cause wastes money and risks repeat failures within weeks.
This systematic process ensures you identify the actual problem, target the failure point, apply the correct fix, and prevent recurrence through proper reassembly.
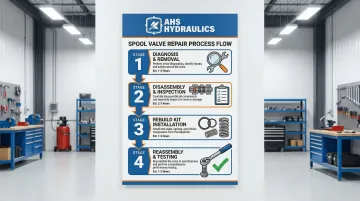
Step 1: Safely Isolate System and Remove Valve
Pressure relief and fluid management:
- Shut down equipment completely and engage parking brake
- Relieve all hydraulic pressure by cycling control levers through full range with engine off
- Open any bleed valves on cylinders or accumulators
- Drain reservoir below valve mounting level to prevent spillage
Documentation before disconnection:
- Tag all hydraulic line connections with masking tape labels (Pressure, Tank, Work Port A, Work Port B)
- Photograph connections from multiple angles with your phone
- Note orientation of valve mounting and control lever position
Contamination prevention:
Thoroughly clean valve exterior with parts cleaner or solvent
Wipe down all hydraulic line fittings before loosening
Place clean drain pan beneath valve to catch residual fluid
Remove mounting bolts and carefully extract valve from equipment
Place on clean, lint-free work surface—a sheet of clean cardboard works well for field repairs
With the valve safely removed, you're ready to open it up and inspect internal components.
Step 2: Disassemble and Inspect for Damage
Careful disassembly:
- Remove end cap bolts in crisscross pattern, noting torque pattern for reassembly
- Carefully extract end caps/glands containing seals and springs
- Slowly slide spool out of bore—handle with extreme care to avoid scratching the polished surface
- Never force anything; binding indicates contamination or distortion
Seal removal:
- Use plastic or brass seal picks only (never steel tools that scratch)
- Remove all old O-rings, backup rings, and wiper seals from grooves
- Inspect seal grooves for damage, burrs, or sharp edges
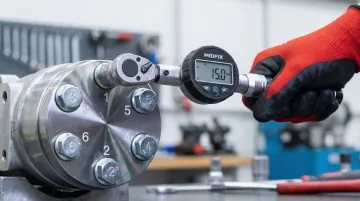
Critical surface inspection:
- Examine spool lands (the raised sections) under good lighting
- Look for deep scratches, scoring, pitting, or discoloration from heat damage
- Inspect visible bore interior similarly
- Run fingernail across suspected damage—if it catches, scoring is too deep for simple repair
Repairability determination:
- Repairable: Light surface corrosion, minor staining, or wear within tolerance
- Replacement required: Deep grooves you can feel, etched surfaces, bore scoring, or clearances exceeding 0.0005-0.001 inches
Once you've confirmed the valve is rebuildable, sourcing quality replacement parts becomes your next priority.
Step 3: Install Rebuild Kit Components
Source correct rebuild kit:
- Verify part number matches your specific valve model exactly
- Ensure kit includes all O-rings, backup rings, wiper seals, and centering springs
- HydraWolf Hydraulics offers American-made rebuild kits with direct pricing—our components are designed specifically for heavy-duty applications in firewood processing, construction, and agricultural equipment
Seal preparation and installation:
- Coat all new seals with clean hydraulic fluid from your system. Never use petroleum jelly or silicone-based lubricants—these contaminate hydraulic fluid.
- Carefully roll new O-rings into grooves without twisting or stretching
- Position backup rings on high-pressure side to prevent seal extrusion under load
- Replace centering springs even if old ones appear functional—weakened springs cause spool drift
Component cleaning:
- Clean all metal parts with residue-free parts cleaner
- Blow dry with filtered compressed air (not shop air that may contain moisture and contaminants)
- Inspect cleaned parts one final time for damage missed during initial inspection
With clean components and fresh seals, proper reassembly determines whether your repair lasts months or years.
Step 4: Reassemble, Torque, and Test
Assembly sequence:
- Lubricate spool generously with clean hydraulic fluid
- Gently slide spool back into bore in correct orientation (note any indexing features)
- Install end caps with new seals
- Finger-tighten all bolts initially to ensure proper alignment
CRITICAL TORQUE PROCEDURE: Using a calibrated torque wrench, tighten end cap bolts to manufacturer specifications in a crisscross pattern, applying torque in 25% increments:
- First pass: 25% of final torque
- Second pass: 50% of final torque
- Third pass: 75% of final torque
- Final pass: 100% of specification
Under-torquing causes post-repair leaks, while over-torquing leads to binding. Never skip this step or use "hand tight plus a quarter turn" methods.
System reinstallation and testing:
- Reinstall valve on equipment per photos and tags
- Reconnect all hydraulic lines, ensuring no cross-threading
- Refill reservoir with fresh, filtered hydraulic fluid
- Start system at low RPM initially
- Cycle all functions slowly to bleed air from system
- Check for external leaks at all connections
- Verify smooth spool operation and proper return to neutral
- Test under load to confirm full pressure and no cylinder drift
When Should You Fix vs Replace Spool Valves?
The repair-or-replace decision depends on damage extent, cost comparison, and expected remaining service life. These scenarios guide the decision:
Scenario 1: External Leaks Only
Fix when:
- Leaks originate from O-rings, seals, or gaskets
- No bore or spool damage present
- Rebuild kit costs $50-150 and restores full function
This represents the ideal repair scenario with 90%+ success rate.
Replace when:
- Valve body casting is cracked
- End cap threads are stripped
- Structural failures cannot be sealed
These conditions require a new valve ($800-2,500 depending on size and features).
Scenario 2: Internal Leakage with Surface Wear
Fix when: spool shows light scoring cleanable with 600-grit abrasive cloth and bore remains smooth. Rebuild kit plus careful cleaning often restores acceptable clearances. Success depends on clearances remaining within 0.001 inches of specification.
However, replace when: spool or bore has deep grooves, pitting, or measurements show clearances exceed manufacturer specs by more than 0.002 inches. No amount of new seals will stop internal bypass when metal-to-metal clearances are excessive.
Scenario 3: Spool Binding Issues
Fix when: binding is caused by contamination buildup, misalignment, or overtightened bolts. Thorough cleaning, rebuild kit, and proper torque procedure solves the problem for under $200. This represents roughly 70% of binding cases.
Replace when: valve body is warped from overheating (verified with straightedge and feeler gauge) or bore is out-of-round. Machining to restore geometry costs more than new valve replacement.
Scenario 4: Age and Service History
Fix when: valve is less than 5 years old, has no previous repair history, and equipment remains in active service. Repair maximizes ROI and extends useful life 3-5 years with proper maintenance.
Replace when: valve has been rebuilt multiple times, equipment has high operating hours approaching end-of-life, or valve model is obsolete making rebuild kits expensive or scarce. Modern replacement valves often feature improved sealing technology worth the investment.

Common Mistakes to Avoid When Fixing Spool Valves
Even experienced operators make these three costly errors when repairing spool valves:
Using Generic O-Rings Instead of Hydraulic-Rated Seals
Hardware store O-rings lack proper pressure ratings (typically only 150-300 PSI) and hydraulic fluid compatibility. Mobile hydraulic systems operate at 2,000-3,000 PSI, with peaks to 5,000 PSI.
Always use hydraulic-specific seals rated for your system's pressure and temperature range.
Skipping Torque Specifications
Over-tightening distorts the bore and causes binding. Under-tightening allows seal extrusion and leaks.
A quality torque wrench costs $50-150 but prevents $2,000 failures. Follow manufacturer specs exactly—typical end cap torque ranges from 15-35 ft-lbs depending on bolt size.
Ignoring the Root Cause of Failure
Rebuilding a valve without changing contaminated fluid or fixing overheating guarantees repeat failure within weeks. Contaminated fluid reduces valve life dramatically—always flush the system and replace fluid during valve repair.
If the valve failed from contamination, your pump, cylinders, and filters need attention too.
Preventive Measures to Avoid Future Spool Valve Problems
Implement regular fluid analysis: Test hydraulic oil every 500 operating hours or annually for contamination, oil thinning, and water content. Maintaining ISO 4406 cleanliness code of 18/16/13 or cleaner protects spool clearances from abrasive wear. Catching problems early prevents valve damage.
Maintain proper filtration: Change hydraulic filters at recommended intervals (typically every 1,000 hours under normal conditions). Upgrade to 10-micron or finer filters if operating in dusty environments.
Particles in the 5-15 micron range cause the most damage because they match spool clearances exactly.
Control operating temperature: Ensure hydraulic coolers remain clean and functional. Avoid prolonged high-load operation generating excessive heat.
Temperature control has dramatic impact on component longevity. Keeping fluid below 180°F extends seal and valve life by 3-5 times compared to operation at 200°F+, and for every 18°F reduction in operating temperature, seal life approximately doubles.
Use quality replacement parts: Source rebuild kits from reputable manufacturers like HydraWolf Hydraulics that specify materials, tolerances, and pressure ratings. Saving $20 on cheap seals often costs $2,000 in premature failure.
American-made rebuild kits using Buna-N or Viton seals appropriate for your application deliver reliable service life matching new valve performance.
Conclusion
Most spool valve problems are repairable at 5-10% the cost of replacement when addressed early and root causes are corrected. The difference between a $150 repair and a $2,000 replacement often comes down to catching symptoms early—before contamination scores the precision surfaces beyond economical repair.
The keys to affordable, long-lasting repairs:
- Proper diagnosis before disassembly
- Quality rebuild kits with precision-matched components
- Correct reassembly following torque specifications
- Preventive maintenance with clean hydraulic fluid
A properly rebuilt valve with quality components—like those manufactured by HydraWolf Hydraulics—and clean fluid typically delivers 3,000-5,000 operating hours of service, similar to new valve lifespan.
Understanding when to repair versus replace saves both immediate costs and long-term downtime. Careful inspection of your valve's condition empowers better maintenance decisions and prevents the false economy of repeatedly rebuilding valves with damaged metal components that should be replaced.
Frequently Asked Questions
Can a hydraulic valve body be repaired?
Bodies with cracked castings, stripped threads, or severely warped bores must be replaced. However, bodies with seal wear, minor surface contamination, or light scoring are excellent candidates for rebuild kits, restoring full function at a fraction of replacement cost.
How much does it cost to rebuild a spool valve?
DIY rebuild costs $50-200 for the kit alone. Professional rebuilds run $200-600 (kit plus 2-4 hours labor). Compare this to $800-3,000+ for new valve replacement—savings of 75-95%.
Can I use automotive O-rings in hydraulic spool valves?
No. Automotive O-rings rated for 150-300 PSI will fail immediately in hydraulic systems operating at 2,000-3,000 PSI. Always use hydraulic-specific seals made from Buna-N or Viton materials designed for high-pressure hydraulic fluid chemistry.
How do I know if my spool valve needs repair or replacement?
If only seals and springs are worn, repair with rebuild kit. If spool or bore surfaces show deep scoring you can feel with your fingernail, or clearances exceed 0.001 inches beyond specification, replacement is required. Surface inspection during disassembly reveals the answer definitively.
What tools do I need to rebuild a spool valve?
You'll need: calibrated torque wrench, plastic or brass seal picks (never steel), lint-free rags, parts cleaning solvent, valve-specific rebuild kit, clean hydraulic fluid, and digital caliper for measuring clearances.
How long does a rebuilt spool valve last?
Properly rebuilt valves with quality parts and clean fluid typically last 3,000-5,000 operating hours or 3-5 years—similar to new valve lifespan. This assumes root causes of original failure were addressed, particularly fluid contamination and operating temperature issues. Maintaining proper filtration and fluid cleanliness is essential.