Introduction
Picture this: You're halfway through a critical job when you notice hydraulic fluid pooling beneath your log splitter's cylinder. What started as a small weep has become a steady drip, and now your equipment is losing power with each cycle. This scenario plays out daily across construction sites, farms, and wood processing operations—and it's almost always caused by failed hydraulic cylinder seals.
Hydraulic cylinder seals are the unsung heroes of your equipment, preventing fluid leaks while maintaining the pressure needed for reliable operation. When these seals fail, the consequences cascade quickly: performance drops, contamination spreads through your hydraulic system, and what could have been a $100 repair becomes thousands in downtime and emergency service calls.
Approximately 90% of hydraulic system failures are contamination-related, with damaged seals serving as both cause and symptom of these problems.
This guide covers:
- Identifying seal problems before they cause major damage
- Understanding seal types and cylinder designs
- Following a proven step-by-step replacement process
- Deciding when repair makes more sense than replacement
- Implementing preventive measures that extend seal life by 2-3 times
Key Takeaways
- External leaks, cylinder drift under load, and loss of holding power signal seal failure requiring immediate attention
- Identify your cylinder type (wire ring vs. threaded gland) before disassembly
- Five critical steps ensure success: pressure release, correct seal kit, component inspection, clean installation, and testing
- Worn seals justify repair; rod scoring, bore damage, or repeated failures require cylinder replacement
What Are Hydraulic Cylinder Seals?
Hydraulic cylinder seals prevent fluid from escaping past the piston (piston seals) or along the rod (rod seals). They maintain the pressure that powers your cylinder's movement.
Think of them as gatekeepers—when working correctly, fluid stays exactly where it should be.
These seals come in multiple materials and designs, each suited for specific operating conditions:
Material Options:
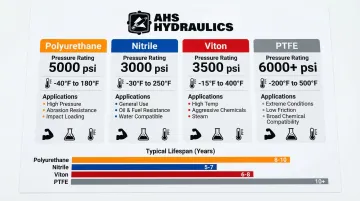
- Polyurethane (TPU): The workhorse for heavy-duty applications, handling pressures up to 8,700 psi and temperatures from -65°F to +275°F with exceptional abrasion resistance
- Nitrile (NBR): General-purpose seals for petroleum-based fluids, suitable for pressures up to 5,800 psi and temperatures to 250°F
- Viton (FKM): High-temperature specialist, operating reliably from -15°F to +400°F in chemically aggressive environments
- PTFE: The low-friction option with universal chemical resistance, functioning across -94°F to +572°F
Each material handles different conditions. The design type determines how the seal functions in your cylinder.
Design Types:
- U-cups: Rod and piston seals that seal tighter when pressurized
- O-rings: Static seals and energizers for other seal types
- Wear rings: Guide components preventing metal-to-metal contact
- Wipers: External seals blocking contaminants from entering the cylinder
Seals are wear items with limited service lives, typically lasting 2,000-10,000 hours depending on your application and maintenance. Planning proactive replacement prevents sudden failures.
Common Problems With Hydraulic Cylinder Seals
Hydraulic cylinder seals fail in predictable patterns. Catching these symptoms early prevents minor leaks from escalating into costly repairs and equipment downtime.
External Oil Leaks Around Rod
What you'll see: Hydraulic fluid coating the chrome rod, dripping from the rod wiper area, or accumulating on the cylinder body near the gland.
Common culprits:
- Worn rod seal (U-cup) allowing fluid to bypass
- Damaged or hardened wiper seal no longer scraping the rod clean
- Scored or pitted chrome rod surface cutting through new seals
- Abrasive contamination that has abraded the seal lip
Internal Seal Bypass (Piston Seal Failure)
What you'll experience: The cylinder drifts downward under load when the valve is closed, extends or retracts slower than normal, loses holding power requiring constant pump operation, or "creeps" when it should remain stationary.
Root causes:
- Worn piston seals allowing fluid to leak across the piston
- Damaged piston O-rings that no longer energize the primary seal
- Contaminated hydraulic fluid causing accelerated seal deterioration
- Pressure spikes that have extruded seal material out of its groove
Excessive Seal Wear or Extrusion
What inspection reveals: Seals showing wear on only one side, seal material squeezed between metal parts creating "flash," torn or cracked seal surfaces, or hardened seal material that has lost elasticity.
Typical triggers:
- Pressure spikes exceeding the seal's rated capacity
- Wrong seal material for your application's pressure or temperature
- Improper installation that twisted or damaged seals during assembly
- Missing or damaged backup rings that should prevent extrusion
Contamination-Related Seal Damage
What you'll find: Seals failing well before expected service life, abrasive scoring visible on seal surfaces, metal particles suspended in your hydraulic fluid, or rapid deterioration across multiple seals.
Likely causes:
- Inadequate filtration allowing particles in the 4-14 micron range to circulate
- Contaminated replacement fluid introduced during service
- Damaged rod chrome generating metal particles with each stroke
- Dirt ingress past a failed wiper seal
Why Hydraulic Cylinder Seals Fail (Root Causes)
Understanding why seals fail prevents you from simply replacing symptoms while the underlying problem destroys your new seals just as quickly.
Operating Stress Factors
Pressure spikes beyond seal ratings occur during hydraulic shock events—when loads stop suddenly or directional valves shift abruptly.
These momentary pressure peaks can reach 2-3 times your system's rated pressure, causing:
- Seal material forced into clearance gaps
- Tearing along the seal edge
- Extrusion (seal material pushed through gaps)
Excessive side loading happens when cylinders aren't mounted properly or when worn bushings allow the cylinder to operate at an angle.
This creates uneven pressure distribution across the seal, wearing one side prematurely while the other side barely contacts the bore.

High cycle frequency accelerates normal wear. A cylinder cycling 60 times per hour wears twice as fast as one cycling 30 times per hour under otherwise identical conditions.
Temperature extremes attack seals from both directions:
- Cold temperatures below seal ratings cause hardening and cracking
- Heat above 140°F causes softening and accelerated degradation
- Oil life halves for every 15°F increase above 140°F
Environmental and Contamination Issues
Abrasive particle contamination causes approximately 90% of hydraulic system failures. Particles as small as 4-14 microns act like sandpaper on seal surfaces, creating grooves that allow fluid to bypass.
Chemical incompatibility between seal material and hydraulic fluid causes swelling, softening, or hardening. Using water-glycol fluid with Viton seals leads to rapid failure since these materials are incompatible.
Water contamination causes seal swelling and promotes corrosion on metal surfaces that then damage seals. Even small amounts (0.1-0.5%) can reduce seal life significantly.
UV exposure and weather degradation affect outdoor equipment, causing seal hardening and surface cracking that leads to leakage.
Installation and Maintenance Gaps
Improper seal installation damages seals before they ever see operating pressure. Common mistakes include:
- Twisting seals during installation
- Forcing seals over sharp threads without protection
- Pinching seals between metal parts
Wrong seal material or size occurs when you substitute "close enough" parts instead of exact replacements. A seal that's 0.010" too small won't maintain proper contact. One that's too large will bind and tear.
Mixing old backup rings with new seals or reusing old O-rings compromises the seal system. Worn backup rings won't prevent extrusion. Old O-rings won't properly energize new seals.
Neglecting to inspect rod scoring or bore damage means new seals contact the same damaged surfaces that destroyed the old ones.
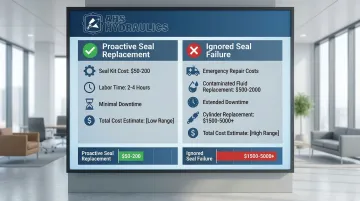
The cost of ignoring seal problems:
- Contaminated hydraulic fluid requiring complete system flush: $500-$2,000
- Equipment downtime and lost productivity: varies by operation
- Safety hazards from unexpected cylinder failure under load
- Damage to expensive cylinder components requiring full replacement: $1,500-$5,000+
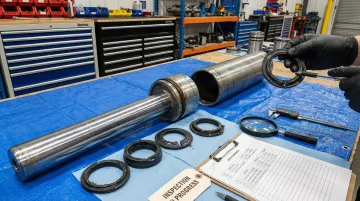
How to Replace Hydraulic Cylinder Seals (Step-by-Step)
Proper diagnosis and preparation prevent wasted effort. Replacing seals won't fix problems caused by damaged cylinder components, and using wrong seal types leads to immediate re-failure. This process ensures correct problem identification, proper seal selection, clean installation, and verification that root causes are addressed.
Step 1: Safety First - Release Pressure and Secure Cylinder
Release all hydraulic pressure by fully retracting or extending the cylinder to its end position, then shut down the hydraulic system.
Disconnect hydraulic lines and immediately cap or plug all ports to prevent contamination.
Support cylinder weight properly during removal. Cylinders range from 50 to 500+ pounds depending on size. Use a hoist, jack stands, or helpers to prevent injury or damage.
Clean the exterior thoroughly before disassembly. Even a small amount of dirt entering the cylinder during disassembly can destroy new seals immediately. Use a pressure washer or degreaser to remove all external contamination.
Work in a clean, well-lit area with adequate space to lay out parts in order. Taking photos during disassembly provides a reference for reassembly.
Step 2: Identify Your Cylinder Type and Order Correct Seal Kit
Determine your cylinder type:
- Wire ring cylinders use internal and external snap rings
- Threaded gland cylinders feature an end cap threading onto the barrel
Locate identification information:
- Manufacturer name, model number, and serial number (usually stamped on the cylinder)
- OR measure bore diameter, rod diameter, and stroke length if markings are missing
Order a complete seal kit specific to your cylinder model. Complete kits include piston seals, rod seal, wiper, O-rings, backup rings, and wear rings. Don't mix seal types or reuse old seals.
Verify seal material compatibility with your hydraulic fluid:
- Petroleum oils: polyurethane, nitrile, or Viton
- Synthetic fluids: confirm with manufacturer
- Water-glycol: nitrile or PTFE (NOT Viton)
- Biodegradable fluids: verify specific compatibility
Step 3: Disassemble the Cylinder (Wire Ring Type)
Remove the external snap ring using snap ring pliers or a flat screwdriver. Work carefully to avoid damaging the ring or groove.
Push the cylinder head inward using a rubber mallet and punch until the internal wire ring groove becomes visible inside the barrel.
Insert the plastic removal ring (included in your seal kit) into the internal groove with the feathered end pointing into the tube. This compresses the internal snap ring for removal.
Extend the rod to pull the head assembly out of the barrel. If you encounter resistance, verify the removal ring is fully seated. Forcing it damages components.
Remove the plastic removal ring, then disassemble the piston from the rod by removing the locknut. Clamp the rod by an unhardened section near the threads. Never clamp the chrome surface, which damages easily.
Step 3 Alternative: Disassemble the Cylinder (Threaded Gland Type)
If your cylinder uses a threaded gland instead of wire rings, follow this process:
Loosen the set screw or locking ring on the end cap to release the thread lock.
Unthread the end cap from the cylinder barrel. Large cylinders may require a strap wrench for leverage without damaging the cap.
Carefully withdraw the rod, piston, and gland assembly as a single unit. Support the weight to prevent bending the rod.
Disassemble the piston from the rod by removing the locknut. Slide off the gland and end cap in sequence.
Step 4: Inspect All Components for Damage
Rod and Bore Inspection
Examine the rod chrome surface by running your fingers along its entire length to detect scoring, pitting, or corrosion. Even minor damage (scratches you can catch with a fingernail) will destroy new seals immediately.
Rods with significant damage must be re-chromed or replaced. The rod surface should measure 0.1 to 0.3 µm Ra (4 to 12 µin) roughness for proper seal performance.
Inspect the cylinder bore interior by running your fingers along the surface to detect scratches, corrosion, or metal transfer. Minor imperfections can be smoothed with 400-grit or finer emery cloth. Work in the direction of rod travel, never circumferentially.
Check the piston for cracks, wear, or damage to the seal grooves. A compromised piston must be replaced.
Seal Wear Analysis
Examine old seals for wear patterns to identify root causes:
- Uneven wear: misalignment or side loading
- Extrusion (material squeezed past groove): pressure spikes
- Hardening or cracking: temperature extremes or chemical incompatibility
- Abrasive scoring: contamination issues
If significant component damage is found, cylinder replacement may be more cost-effective than repair. HydraWolf's technical team can help evaluate repair versus replacement based on your specific cylinder condition and application requirements.
Step 5: Remove Old Seals and Prepare Surfaces
Remove all old seals one at a time, noting exact position and orientation. Take photos for reference. Seal order and direction matter.
Clean all seal grooves thoroughly using lint-free cloth and appropriate solvent. Remove lacquer buildup (varnish-like residue from old fluid), old seal residue, and contaminants. Grooves must be completely clean for new seals to seat properly.
Polish out minor surface imperfections using 400-grit or finer emery cloth on the rod or bore. Work in the direction of rod travel. Circumferential polishing creates grooves that cut seals.
Inspect seal grooves for damage, burrs, or sharp edges. Deburr any sharp edges with fine emery cloth.
Step 6: Install New Seals Correctly
Install new seals one at a time in exact positions as original seals. Refer to seal kit instructions and photos taken during disassembly.
Lubricate each seal with clean hydraulic fluid before installation. This prevents tearing and ensures proper seating. Never use petroleum jelly or silicone grease unless specified by the seal manufacturer.
For U-cup seals, ensure lips face toward the pressure side. Reversed seals leak immediately.
Seal Installation Tools and Techniques
Use proper seal installation tools (kidney bean tool for rod seals) to avoid damaging seal lips during installation over threads or sharp edges. These protect PTFE and polyurethane seals from installation damage.
Install backup rings and wear rings in correct sequence. These prevent seal extrusion (material being forced out) and provide piston support. Refer to your seal kit diagram for proper order.
Reassemble the piston to rod and torque the locknut to manufacturer specification. There is no universal torque value. Specifications vary widely by cylinder bore and manufacturer.
Under-torquing allows loosening; over-torquing damages threads. Consult your cylinder's technical documentation for correct values.
Step 7: Reassemble Cylinder
For wire ring cylinders:
- Install band clamp on head assembly to compress internal snap ring
- Lubricate bore and piston seals liberally with clean hydraulic fluid
- Insert piston into barrel using slight rocking motion, tapping gently with rubber mallet until internal ring seats in groove
- Install external snap ring, ensuring it's fully seated in its groove
For threaded gland cylinders:
- Lubricate bore and all seals with clean hydraulic fluid
- Insert piston/rod/gland assembly using slight rocking motion to avoid seal damage
- Apply anti-seize compound to threads
- Thread end cap onto barrel and torque to specification
- Tighten set screw or locking ring to prevent loosening
Verify smooth operation by extending and retracting the rod by hand before reinstallation. Binding indicates improper assembly. If you feel resistance, disassemble and correct the problem.
Double-check all snap rings or locking mechanisms are fully engaged before pressurizing the cylinder. Partially seated snap rings can blow out under pressure.
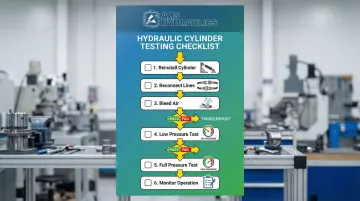
Step 8: Reinstall, Test, and Monitor
With your cylinder properly reassembled and verified, you're ready for final installation and testing.
Reinstall the cylinder on equipment, ensuring all mounting hardware is tight and properly aligned to prevent side loading.
Reconnect hydraulic lines, ensuring connections are clean and tight. Keep all connection points clean during this process to protect your new seals.
Bleed air from the cylinder by loosening the high-point fitting while cycling the cylinder slowly several times. Trapped air causes erratic operation and pressure spikes.
Operate through several full cycles at low pressure first. Gradually increase to working pressure while checking for leaks at all connections and seal areas.
Monitor cylinder during first hours of operation:
- Check for external leaks around rod and gland
- Verify holding power under load (no drift or creep)
- Ensure smooth operation without jerking or hesitation
- Listen for unusual noises indicating air or cavitation
If leaks appear immediately, you've either installed seals incorrectly or damaged them during assembly. Disassemble and inspect. If the cylinder drifts under load, internal piston seals aren't seating properly or bore damage exists.
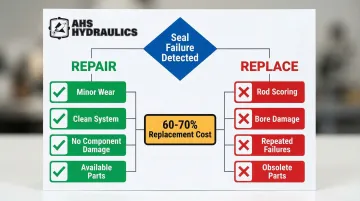
When Should You Repair vs Replace Hydraulic Cylinder Seals?
Knowing whether to repair seals or replace the entire cylinder depends on four key factors: repair cost versus replacement cost, expected downtime, current cylinder condition, and long-term reliability needs.
Use these scenarios to guide your decision:
Scenario 1: Minor Seal Wear, Clean System, No Component Damage
Repair when:
- Seal kit costs $50-$200 with 2-4 hours labor
- Cylinder should provide another 2,000-5,000 hours of service
- System contamination isn't an issue
Replace only if:
- Cylinder is undersized for your application
- Outdated design limits performance
- You need capacity upgrade
Scenario 2: Seal Failure with Rod Scoring or Bore Damage
Repair when:
- Damage is minor and can be polished out with emery cloth
- Surface issues are superficial only
Skip repair if moderate scoring exists—professional re-chrome ($300-$800) or bore honing ($200-$500) pushes total repair cost near replacement cost.
Replace when:
- Rod requires re-chroming AND seals need replacement
- Bore is severely scored beyond simple polishing
- Combined repair costs exceed 60-70% of new cylinder price
A new cylinder from HydraWolf includes warranty coverage and predictable service life, often making it the smarter long-term investment.
Scenario 3: Repeated Seal Failures or Contaminated System
Repair only after addressing root cause:
- Install better filtration to achieve target ISO cleanliness codes
- Fix pressure spikes with proper relief valves
- Correct side loading through proper alignment
Without fixing these issues first, new seals fail just as quickly.
Replace when:
- Cylinder design is inadequate (wrong seal type, insufficient seal support)
- Materials incompatible with your fluids or temperatures
- Operating conditions exceed original cylinder specifications
Scenario 4: Older or Non-Standard Cylinder
Repair becomes impractical when:
- Seal kits are unavailable from manufacturer
- Custom seals required ($300-$1,000+)
- Total repair costs exceed replacement cost
Replace to gain:
- Modern seal designs with better longevity
- Standard replacement parts availability from HydraWolf
- Improved performance specifications
- Manufacturer warranty coverage
Consider replacement as an upgrade opportunity rather than just a repair.
Common Mistakes to Avoid When Replacing Hydraulic Cylinder Seals
Even experienced operators make costly errors during seal replacement. Avoid these common mistakes:
- Installing seals without fixing the root cause (rod scoring, contamination, pressure spikes)—new seals fail just as quickly when the underlying problem remains
- Using incorrect seal material or design—not all seals are interchangeable even if they physically fit. Wrong material leads to rapid failure from chemical incompatibility or temperature extremes
- Damaging seals during installation by forcing them over threads or sharp edges without proper tools. Even minor nicks cause immediate leakage
- Mixing old and new components by reusing worn backup rings, wear rings, or O-rings. Worn parts won't support new seals properly
- Inadequate cleaning that allows contamination to damage new seals immediately upon startup
- Skipping torque specifications on the piston locknut—improper torque causes loosening during operation or thread damage from over-tightening
- Failing to verify seal orientation, especially U-cups which must face the pressure side. Reversed seals leak immediately since they can't function properly under pressure
- Pressurizing without bleeding air—trapped air causes erratic operation and pressure spikes that damage seals and create unsafe conditions
Preventive Measures to Avoid Future Seal Failures
Proper maintenance extends seal life 2-3 times and prevents unexpected failures that halt operations. For equipment owners, this translates to lower parts costs, reduced downtime, and fewer emergency repairs that disrupt production schedules.
Regular Inspection and Monitoring
Catching seal wear early allows for planned maintenance rather than emergency repairs.
Implement regular inspection schedule:
- Check for external leaks monthly during routine equipment walkarounds
- Monitor cylinder drift under load to detect internal seal wear before complete failure
- Inspect rod chrome condition quarterly, addressing minor surface damage before it destroys seals
- Replace seals at 70-80% of expected service life, before failure occurs
Hydraulic Fluid Management
Clean, properly specified fluid is the foundation of long seal life.
Maintain hydraulic fluid quality:
- Use correct fluid type for seal materials and operating temperature range
- Maintain proper filtration levels (typically ISO 16/14/11, which measures particle contamination)
- Change fluid per manufacturer schedule or extend intervals using oil analysis
- Test fluid annually for contamination, water content, and additive breakdown
Environmental Protection
Shielding cylinders from harsh conditions prevents premature seal degradation:
Protect cylinders from environmental damage:
- Install rod boots on exposed cylinders to prevent UV and weather degradation
- Keep wiper seals clean and functional to prevent dirt entry
- Store equipment indoors when possible to minimize environmental exposure
- Clean cylinders regularly to prevent dirt and debris accumulation
Operating Conditions
Address operating condition issues:
- Install pressure relief valves to prevent spikes beyond seal ratings
- Correct side loading through proper cylinder mounting and alignment
- Avoid operating in extreme temperatures outside seal material ratings
- Size cylinders appropriately for application loads to prevent overworking seals
Conclusion
Hydraulic cylinder seal replacement is achievable DIY maintenance when you understand cylinder types, use correct seals, follow proper procedures, and address root causes of failure.
Success comes down to four critical factors:
- Correct diagnosis – identifying seal type and failure cause
- Quality parts – complete seal kits from reputable suppliers
- Proper technique – clean installation without seal damage
- Thorough testing – verifying repair before returning to service
Beyond technique, knowing when to repair versus replace saves money long-term. Repair makes sense for simple seal wear in cylinders with undamaged components. Replacement is smarter when rods are scored, bores are damaged, or the cylinder design is inadequate for your application's demands.
If you need guidance on seal selection or deciding between repair and replacement, HydraWolf Hydraulics' technical team offers direct support—backed by over a decade of manufacturing hydraulic components for heavy machinery operations.
Frequently Asked Questions
How to tell if hydraulic cylinder seals are bad?
Visible signs include external oil leaks around the rod, fluid dripping from the wiper area, or oil accumulation on the cylinder body. Performance symptoms include cylinder drift under load, slow or uneven movement, loss of holding power, and cylinder "creep" when it should remain stationary.
How long do hydraulic cylinder seals typically last?
Service life ranges from 2,000 to 10,000 hours depending on application severity, operating conditions (pressure, temperature, contamination), seal material quality, and maintenance practices. Operating above 140°F significantly reduces seal life.
Can I replace just the rod seal without doing the piston seals?
While technically possible, best practice is replacing the complete seal kit. The disassembly labor is identical whether you replace one seal or all seals, and partial repairs often lead to piston seal failure shortly after.
What causes hydraulic cylinder seals to fail prematurely?
Main causes include contamination from inadequate filtration, improper installation damaging seals during assembly, wrong seal material for your fluid or temperature range, pressure spikes exceeding seal ratings, and rod surface damage from impacts or corrosion.
Do I need special tools to replace hydraulic cylinder seals?
Basic hand tools (wrenches, socket set, snap ring pliers, rubber mallet) handle most jobs. Seal installation tools prevent damage during assembly, a torque wrench ensures proper tightening to specs, and a band clamp helps with wire ring cylinder reassembly.
When should I replace the entire cylinder instead of just seals?
Replace the entire cylinder when rod chrome is severely scored requiring expensive re-chrome, the bore is damaged beyond polishing, cylinder design is inadequate for your application, or seal kits are obsolete making custom seals cost-prohibitive compared to a new unit.