Introduction
Hydraulic systems require periodic fluid changes to maintain performance, but flushing is a far more thorough process.
A simple drain-and-fill replaces degraded oil. Flushing actively removes sludge, varnish, and contamination embedded in conductor walls, dead spots, and internal surfaces.
The difference matters: over 75% of hydraulic failures trace back to contaminated fluid. Particles cause scoring in pumps and valves, silt creates stiction in servo controls, and debris accelerates wear throughout the system. A proper flush eliminates these contaminants before they destroy components.
Success depends on more than just circulating fresh oil. Critical requirements include:
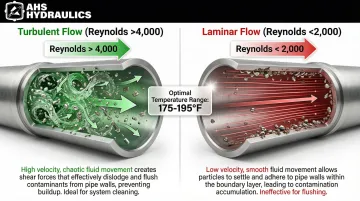
- Achieving turbulent flow conditions (velocity sufficient to dislodge particles)
- Maintaining temperatures between 175-195°F to reduce viscosity
- Verifying cleanliness through oil analysis before completion
Rushing the process or skipping these steps leaves contaminants in place, wasting time and money while putting replacement components at risk.
This guide details 11 steps for properly flushing a hydraulic system, explains when flushing is necessary versus a routine fluid change, and identifies common mistakes that compromise effectiveness.
Key Takeaways
- Removes sludge, varnish, and particles from conductor walls and dead spots—far more thorough than oil changes
- Required after major failures, new equipment commissioning, fluid changes, or visible contamination
- Success requires turbulent flow (Reynolds >4,000), 175-195°F temperature, and cleanliness verification
- 11-step process: hot draining, reservoir cleaning, low-viscosity circulation, actuator cycling, oil analysis
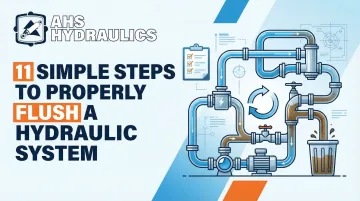
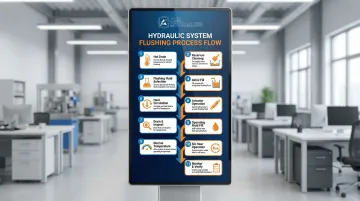
11 Steps to Properly Flush a Hydraulic System
Step 1: Drain the System at Operating Temperature
Drain hydraulic fluid at operating temperature. Hot fluid has lower viscosity, flows more easily, and carries suspended contaminants out with it.
Cold fluid leaves deposits behind.
Drain all system points:
- Reservoir drain plug
- Hydraulic lines at low points
- Cylinder ends (extend fully, then retract to drain rod side)
- Accumulators
- Filter housings
- Dead spots or pockets where fluid collects
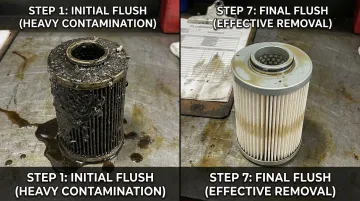
Replace all filters at this stage.
Inspect the removed filters carefully—heavy contamination, metallic particles, or unusual discoloration indicates problem severity and may reveal root causes requiring attention before proceeding.
Step 2: Mechanically Clean the Reservoir
Flushing fluid through a dirty reservoir immediately recontaminates the system. Manual cleaning is essential.
Cleaning procedure:
- Use lint-free rags to wipe all interior surfaces
- Remove sludge, varnish deposits, and debris from walls, bottom, and baffles
- Check for loose or flaking paint that could become a contaminant source
- Scrape off any stubborn deposits
Inspect for signs of microbial growth (biological contamination), water contamination, or unusual deposits. These indicate root cause issues—water ingress, wrong fluid type, or excessive heat—that must be addressed before refilling.
Step 3: Select and Prepare Flushing Fluid
With the reservoir clean, the next critical decision is choosing the right flushing fluid. Turbulent flow dislodges particles from conductor walls, while laminar flow leaves a stationary boundary layer where contaminants hide.
Flushing fluid requirements:
- Lower viscosity than operating fluid to achieve turbulence
- Target Reynolds number between 4,000-6,000 for effective cleaning
- Compatible with system seals and components
- According to ISO 23309, achieving turbulent flow is mandatory for effective flushing
Viscosity considerations: If your operating fluid's viscosity prevents turbulent flow at available pump rates, use a lower-viscosity flushing oil. Some situations allow using the actual operating fluid if viscosity is appropriate, but dedicated flushing fluids are more effective.
Never use diesel fuel, harsh solvents, or incompatible fluids—these damage seals and leave residues.
Step 4: Fill System and Perform Initial Circulation
Fill the reservoir to approximately 75% capacity with flushing fluid. Never fill completely—fluid expands as it heats, and you'll need room for thermal expansion.
Priming sequence to prevent pump cavitation:
- Open pressure relief/bypass valve fully
- Run pump for 15 seconds
- Stop for 45 seconds to allow air to rise
- Repeat 3-4 times
This gradual approach bleeds air from the pump and prevents cavitation damage during initial startup. Listen for unusual sounds—smooth operation indicates proper priming.
Step 5: Circulate Flushing Fluid to Operating Temperature
Circulate fluid to build temperature and reduce viscosity.
Circulation procedure:
- Run pump for one minute with bypass open
- Stop for one minute to allow settling
- Gradually close bypass valve
- Operate loaded for no more than five minutes initially
Allow the relief valve to lift periodically to confirm it's flushed, but avoid operating actuators at this stage.
Monitor fluid temperature rise to the 175-195°F range—heat is critical for reducing viscosity and increasing cleaning effectiveness. ISO 23309 recommends minimum 40°C (104°F), but higher temperatures within seal limits work better.
Step 6: Operate Actuators Individually
Sequential actuator operation ensures each circuit is thoroughly flushed without excessive fluid level drop.
Procedure:
- Start pump and stabilize pressure
- Operate one actuator through full stroke (extend and retract completely)
- Allow fluid to return to reservoir
- Move to next actuator
Monitor reservoir level continuously. Add fluid to maintain at least 25% level. If level drops below this, stop and refill to 50% before continuing. Operating with low fluid introduces air and causes pump cavitation.
Step 7: Drain Flushing Fluid and Inspect
Drain the flushing fluid as hot as possible. Heat keeps contaminants suspended for maximum removal. Drain quickly to prevent particles from settling.
Post-flush inspection:
- Replace all filters again
- Inspect removed filters for contamination type and quantity
- Compare to filters from Step 1—you should see significantly less contamination
- Inspect reservoir interior again for any remaining deposits
- Re-clean if necessary
If switching fluid types, check carefully for cross-contamination or residue that indicates incomplete flushing.
Step 8: Refill with Operating Fluid and Continue Circulation
Fill the reservoir to 75% capacity with your actual operating fluid. Repeat the bleeding and priming procedure from Step 4.
Air purging process:
- Run system in five-minute intervals
- Shut down between intervals to bleed air from high points
- Open bleed valves at cylinders, manifolds, and other high points
- Continue until fluid emerging is bubble-free
Listen for pump cavitation sounds (grinding, whining, or rattling). Smooth, quiet operation indicates proper air purging.
Quality replacement components—whether cylinders, filters, or fittings—prevent introducing new contamination sources during refilling. American-made parts manufactured to tight tolerances maintain system cleanliness from day one.
Step 9: Bring System to Normal Operating Temperature
Run the system for 30 minutes to reach full operating temperature and pressure. This final circulation ensures all circuits are filled with clean operating fluid.
Final inspection decision point:
- Shut down after 30 minutes
- Replace filters again
- Thoroughly inspect reservoir for cross-contamination
Decision criteria:
- If cross-contamination is visible: Repeat the entire flushing process
- If clean: Proceed to final verification steps
Don't skip this inspection. Visible contamination at this stage means the flush failed, and continuing will damage components.
Step 10: Perform Initial Operating Period and Filter Change
Operate the system normally for six hours under typical working conditions. This circulates fluid through all circuits under real-world loads.
After six hours:
- Shut down and replace filters
- Take fluid sample for oil analysis
- Submit sample to lab for ISO cleanliness code testing
Compare results against your target cleanliness level. Caterpillar recommends ISO 18/15 or cleaner for hydraulic systems.
If your target is ISO 15/13/11, aim to achieve ISO 14/12/10 or better—one code cleaner than operating specifications. If results don't meet target, continue circulating and retest.
Step 11: Monitor and Verify System Stability
Increase sampling frequency initially to confirm the system remains stable.
Monitoring schedule:
- Sample at 25 hours
- Follow up at 50 hours
- Final verification at 100 hours
- Return to normal intervals once stable
Monitor for warning signs:
- Performance issues (slower actuators, reduced force)
- Unusual sounds (cavitation, grinding, whining)
- Temperature anomalies (overheating)
- Rapid filter loading (indicates ongoing contamination)
Document the entire flush procedure, all filter changes, fluid analysis results, and system observations. This creates a maintenance record and baseline for future reference.
When Should You Flush Your Hydraulic System?
Flushing is not routine maintenance. It's a specific response to contamination events or system conditions that a simple oil change cannot address.
Six scenarios requiring a full flush:
New equipment contains manufacturing debris like welding slag, scale, and preservatives. ISO 23309 addresses flushing systems "after manufacture" to remove this contamination.
Pump or motor failures distribute metallic debris throughout the circuit. Replacement components fail immediately without flushing.
Equipment in extended storage develops condensation, oxidation, and settled contaminants requiring removal before restart.
Visible sludge or varnish indicates severe oxidation that simple filtration cannot remove.
Switching fluid types (mineral to synthetic, different viscosity grades) requires complete old fluid removal to prevent compatibility issues.
Major repairs introduce contamination from assembly, new components, and opened circuits.
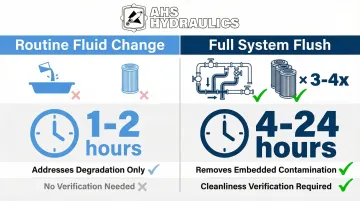
How flushing differs from routine fluid changes:
| Routine Fluid Change | Full System Flush |
|---|---|
| Drains bulk fluid | Drains all fluid circuits |
| Replaces filter once | Multiple filter changes |
| Simple refill | Turbulent circulation cleaning |
| No verification | Cleanliness verification required |
Well-maintained systems with proper filtration may never need flushing beyond initial commissioning.
What You Need Before Flushing a Hydraulic System
Proper preparation directly impacts flush effectiveness and prevents damage during the process.
Essential equipment and materials:
- Appropriate flushing fluid (lower viscosity if possible)
- Complete filter set for 3-4 changes
- Lint-free cleaning rags (never shop rags that shed fibers)
- Fluid sampling equipment and clean containers
- Reservoir cleaning tools (scrapers for stubborn deposits)
- Bleeding and venting tools
- Oil analysis testing capability or lab service
- Proper fluid disposal containers for contaminated oil
- Personal protective equipment (gloves, safety glasses, absorbent materials)
Beyond equipment, operator knowledge determines flush success.
Critical operator requirements:
- Complete understanding of system layout and all drain points
- Ability to identify normal versus abnormal sounds during operation to detect problems
- Knowledge of proper bleeding procedures to prevent air-related damage
- Awareness of safety protocols for hot fluid (175-195°F can cause severe burns) and pressurized systems
- Access to system documentation showing target cleanliness levels and fluid specifications
When replacing filters and seals, use components with appropriate micron ratings and collapse pressure specifications to handle flushing conditions. HydraWolf Hydraulics manufactures filters designed specifically for demanding hydraulic applications in firewood processing and heavy machinery, preventing contamination during maintenance procedures.
Common Mistakes When Flushing a Hydraulic System
Even experienced operators make critical errors during hydraulic system flushing that undermine the entire process. Avoid these six common mistakes:
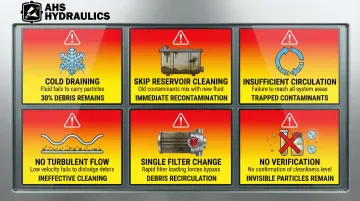
Draining the system cold: Cold fluid's high viscosity traps contaminants that would drain at operating temperature—potentially leaving up to 30% of debris behind.
Skipping mechanical reservoir cleaning: Flushing fluid without manually scrubbing the reservoir leaves sludge deposits that immediately recontaminate your fresh oil.
Insufficient circulation time or cycles: Rushing the process—failing to circulate at least 5-6 complete system volumes or operate all actuators—leaves contaminants trapped in dead spots.
Not achieving turbulent flow: Using fluid that's too thick or flows too slowly creates smooth (laminar) flow. Without adequate turbulence, flushing becomes ineffective because contaminants cling to pipe walls instead of washing away.
Inadequate filter changes: Changing filters just once lets captured debris recirculate. Plan for 3-4 complete filter replacements during a thorough flush.
Failing to verify cleanliness: Skipping oil analysis means you're guessing whether the flush succeeded. Particles below 40 microns cause wear but remain invisible to visual inspection.
Frequently Asked Questions
How do I know if my hydraulic filter is clogged?
Key warning signs include activated bypass indicators, reduced performance, slower actuator speeds, and increased operating temperature. Pressure drop exceeding 25-35 psid indicates clogging—monitor differential pressure gauges and change filters on schedule before failure occurs.
What's the best way to clean up hydraulic fluid?
Contain spills immediately with petroleum-rated absorbent pads and dispose of contaminated materials per local regulations. Clean surfaces with hydraulic oil degreasers and use drip pans during service to prevent spills.
How long does it take to flush a hydraulic system?
Small systems (under 50 gallons) typically require 4-8 hours, while large industrial systems (500+ gallons) may take 1-3 days. Flushing continues until verification samples meet target cleanliness—rushing compromises effectiveness.
Can I use the same fluid for flushing as my operating fluid?
Operating fluid works if it achieves turbulent flow (Reynolds number >4,000), but lower viscosity flushing fluid is more effective. Never use incompatible fluids, solvents, or diesel fuel—these damage seals and contaminate your system.
How often should I flush my hydraulic system?
Flushing isn't routine maintenance—perform it only for contamination events, major failures, fluid type changes, commissioning, or after overhauls. Well-maintained systems with proper filtration and oil analysis may never need flushing beyond initial commissioning.
What's the difference between flushing and changing hydraulic fluid?
Fluid changes (1-2 hours) drain old fluid, replace filters, and add new fluid to address degradation. Flushing (4-24 hours) includes complete drainage, mechanical cleaning, turbulent circulation, and verification to remove contaminants from internal surfaces. Choose flushing for contamination problems, fluid changes for routine maintenance.