This guide covers how to diagnose spool valve leaks, differentiate normal from problematic leakage, perform step-by-step repairs, decide whether to fix or replace, and prevent future issues.
Key Takeaways
- Internal leakage from radial clearance is normal in spool valve design
- Watch for cylinder drift, pressure loss, slow response, or efficiency drops
- Diagnose through pressure testing, visual inspection, and component isolation
- Clean, replace seals, or recondition the spool—swap the valve if wear is excessive
- Preventive maintenance and quality components significantly reduce premature failures
What Is a Spool Valve?
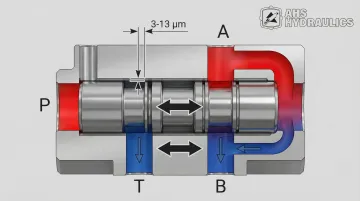
A spool valve is a directional control valve that uses a cylindrical spool sliding within a precision-machined bore to direct hydraulic fluid flow between ports. The spool features lands (larger diameter sections) and grooves (smaller diameter sections) that block or open specific ports as the spool moves along its length.
Understanding why spool valves leak starts with their design. Unlike poppet valves—which seal against a seat and stay virtually leak-free—spool valves need radial clearance between the spool and bore for smooth movement.
This clearance makes some internal leakage inevitable.
Typical radial clearance ranges:
- Standard industrial valves: 3 to 13 microns (0.00012 to 0.00051 inches)
- Precision/servo valves: 0.5 to 5 microns
Spool valves are common in mobile and industrial hydraulic systems—construction equipment, firewood processors, agricultural machinery—due to their fast response, multiple position capability, and durability under demanding conditions.
Common Problems With Spool Valves
Most spool valve failures follow predictable patterns related to wear, contamination, or operating conditions. Recognizing symptoms early prevents costly downtime.
Excessive Internal Leakage
Symptoms:
- Cylinder drift (especially horizontal cylinders holding a load)
- Slow actuator movement
- Loss of holding force
- Reduced system pressure
- Excessive heat generation
Likely Cause: Worn spool or bore increasing radial clearance beyond design tolerance. This typically results from contaminated fluid or extended service life.
External Leakage at Valve Body
Symptoms:
- Visible hydraulic fluid weeping or dripping from valve housing
- Leaks at O-ring grooves or end caps
- Fluid accumulation around port connections
Likely Cause: Damaged or aged O-rings, worn seals, over-torqued fittings, or cracked valve body.
Spool Sticking or Binding
Symptoms:
- Valve fails to shift or shifts sluggishly
- Inconsistent actuator movement
- Requires higher pilot pressure to actuate
- Solenoid draws excessive current or burns out
Likely Cause: Contamination (dirt, metal particles, varnish buildup), corrosion from moisture, incorrect fluid viscosity, or mechanical damage.
Industry data shows contamination causes 65-90% of hydraulic system failures.
Erratic or No Valve Response
Symptoms:
- Actuator doesn't move when valve is commanded
- Intermittent operation
- Valve doesn't return to center position
Likely Cause: Failed solenoid, broken return spring, contamination blocking ports, electrical connection issues, or mechanical obstruction.
Excessive Heat Generation
Symptoms:
- Valve body unusually hot to touch
- Fluid temperature rise
- Thermal degradation of seals
Likely Cause: Internal leakage causing fluid bypass and energy conversion to heat, or valve cycling too frequently under high pressure.
Why Spool Valves Fail (Root Causes)
Spool valve failures stem from operational stress, environmental exposure, and maintenance gaps. Understanding root causes prevents repeat failures.
Operational and environmental factors:
- Fluid contamination: Particles in the 5-15 micron range cause abrasive wear and jamming
- High pressure spikes
- Moisture entry causing corrosion
- Excessive cycling
- Operating outside temperature range (petroleum-based fluids should stay between 40°C-60°C / 104°F-140°F)
- Incorrect fluid viscosity
- Vibration loosening components
Of all these factors, contamination causes the most damage. Research confirms that 65-90% of hydraulic component failures are directly caused by fluid contamination.
Hard particles bridge the oil film, scoring surfaces and generating more contamination in a destructive chain reaction. Particles matching the critical radial clearance (5-15 microns) are especially problematic, creating "silting" that jams the spool in place.
Consequences of Ignoring Early Symptoms
- Minor leakage progresses to complete loss of function
- Contamination spreads to other system components (pumps, cylinders)
- Increased energy consumption from bypassing fluid
- Safety risks from unexpected actuator movement
- Costly emergency downtime versus planned maintenance
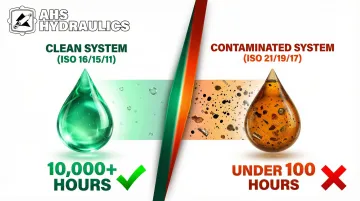
Service life expectations:
- Clean systems (ISO 16/15/11): 10,000+ hours of reliable operation
- Contaminated systems (ISO 21/19/17): Under 100 hours before failure
How to Diagnose and Fix Spool Valve Leaks (Step-by-Step)
Attempting repairs without proper diagnosis wastes time and money. Systematic diagnosis identifies the actual problem, isolates the root cause, and ensures the correct fix is applied.
Step 1: Identify Symptoms and Initial Assessment
Observe and document specific symptoms:
- Does cylinder drift occur (direction and rate)?
- Is there visible external leakage?
- Does the valve respond slowly or not at all?
- Is the valve body excessively hot?
Note operating conditions when problem occurs:
- At startup, under load, during continuous operation
- After sitting idle
- In specific valve positions
- Intermittently
Check for obvious issues:
- Loose electrical connections on solenoids
- Damaged hydraulic lines
- Low fluid level
- Contaminated fluid (check for discoloration, particles, water)
- Proper fluid temperature
Step 2: Isolate the Valve and Perform Pressure Tests
Setup:
- Disconnect actuator lines
- Install pressure gauges at valve work ports (A and B)
- Position valve in center/neutral position
Pressure test procedure:
- With system at operating pressure, observe gauge readings
- For closed-center spool valves: 30-50% of supply pressure at work ports is normal internal leakage
- If pressure at work ports exceeds 50% of supply pressure, excessive internal leakage is confirmed
- Command valve to each position and verify appropriate ports pressurize/depressurize
- Sluggish response or failure to shift indicates sticking/binding
External leak check: With system pressurized, inspect all valve sealing surfaces, O-rings, end caps, and port connections for fluid seepage using a clean rag or paper.
Step 3: Determine Root Cause Category
Categorize the problem based on test results:
- Excessive internal leakage (worn spool/bore)
- External leakage (failed seals)
- Mechanical binding (contamination/corrosion)
- Electrical/control failure (solenoid/pilot issue)
Rule out external factors:
- Verify pump output pressure
- Check relief valve setting
- Confirm fluid cleanliness meets ISO standards (target ISO 18/16/13 for standard directional valves, ISO 16/14/11 for servo valves)
- Inspect filters for bypass or saturation
Step 4: Repair Based on Diagnosed Problem
Proper categorization from Step 3 prevents replacing functional components and ensures your repair addresses the actual failure mode. The repair approach depends entirely on what you've diagnosed.
Excessive Internal Leakage (Worn Spool/Bore)
- Disassemble valve per manufacturer instructions, noting spool orientation
- Measure spool and bore diameter at multiple points with micrometer
- Calculate radial clearance and compare to specs (typically 0.0002-0.0003" for select fit)
If clearance is within tolerance:
- Clean spool and bore thoroughly with lint-free cloth and appropriate solvent
- Inspect for scoring or scratches
- Polish minor imperfections with #500 grit abrasive paper (apply lightly to outer diameter only, avoiding sharp metering edges)
- Reassemble with new O-rings
If clearance exceeds tolerance: Replacement of spool, sleeve, or complete valve cartridge required. Field repair is not practical—specialized machine shops can re-sleeve bores and fit oversized spools, but cost typically exceeds replacement for standard valves.
External Leakage (Failed Seals)
- Identify leaking seal locations during pressure test
- Disassemble valve to access failed seals, photographing assembly sequence
- Replace all O-rings and seals with manufacturer-specified parts
Seal material compatibility is critical:
| Seal Material | Compatible Fluids | Temperature Range |
|---|---|---|
| Nitrile (NBR/Buna-N) | Petroleum oils, water-glycol (HFC) | -34°C to +100°C |
| Fluorocarbon (FKM/Viton) | Petroleum oils, synthetic fluids, biodegradable fluids | -26°C to +204°C |
| EPDM | Phosphate esters (HFD-R), glycol brake fluids | -57°C to +150°C |
- Inspect seal grooves for damage, burrs, or contamination
- Clean grooves thoroughly and check dimensions
- Apply light coat of hydraulic fluid to seals during reassembly
Spool Sticking or Binding
- Disassemble valve and inspect for contamination: metal particles, dirt, varnish deposits, or corrosion
- Clean all components with appropriate solvent; consider using ultrasonic cleaner if available for thorough cleaning of complex passages
- Inspect spool surface and bore for scoring, corrosion pits, or varnish buildup; light polishing may restore function if damage is minimal
- Check return springs for breakage or weakening
- Critical: If contamination source is not addressed (filters, breathers, fluid condition), binding will recur—trace contamination source
Electrical/Control Failure (Solenoid Valves)
- Test solenoid coil resistance with multimeter and compare to manufacturer specification (typically 10-50 ohms). Most 24V DC coils measure ~23-42 ohms at 20°C
- Check for proper voltage at solenoid terminals when activated
- Verify wiring connections are clean and tight
- Inspect manual override (if equipped) to verify mechanical valve function independent of solenoid
- Replace failed solenoid with correct voltage/current rating
- Verify new solenoid shifts valve freely before reconnecting hydraulics
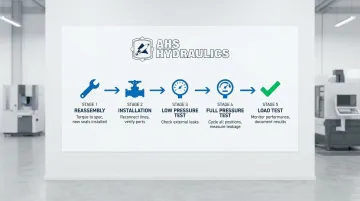
Step 5: Reassemble, Test, and Validate the Repair
- Reassemble valve with new seals and cleaned/repaired components following manufacturer torque specifications
- Reinstall valve in system and reconnect hydraulic lines; ensure proper port connections (P, T, A, B)
- Start system and run at low pressure initially, checking for external leaks
- Gradually increase to operating pressure and cycle valve through all positions multiple times
- Repeat pressure test from Step 2 to confirm internal leakage is within acceptable range (30-50% of supply pressure)
- Test actuator performance under normal and peak load conditions
- Monitor for return of original symptoms over several cycles
- Document repair actions, measurements taken, parts replaced, and final test results for maintenance records
When Should You Fix vs Replace a Spool Valve?
The fix-or-replace decision balances repair cost, downtime, reliability risk, and remaining service life. Careful evaluation prevents both premature replacement and continued operation of unreliable components.
Scenario: Minor External Leakage, Valve Functions Properly
Fix when:
- Pressure tests show internal leakage within tolerance
- Spool shifts smoothly without binding
- Only external seals leak—seal replacement is cost-effective
Replace when:
- Valve body shows cracks or damage
- Seal grooves show wear preventing proper seal function
- You've repeatedly repaired the same issue
Scenario: Excessive Internal Leakage, Spool/Bore Worn Beyond Tolerance
Repair rarely makes sense: Specialized machine shops can re-sleeve bores and fit oversized spools, but this cost typically exceeds replacement for standard valves.
Replace when:
- Radial clearance exceeds manufacturer tolerance
- Valve is a standard catalog item
- Replacement parts are readily available (check with suppliers like HydraWolf for quick-ship components)
Scenario: Contamination-Related Sticking, No Significant Wear
Fix when:
- Spool and bore show no scoring or measurable wear
- Thorough cleaning restores smooth operation
- You can upgrade filters or change contaminated fluid
Replace when:
- Scoring or corrosion pitting goes too deep to polish out
- You can't control the contamination source (new valve will fail the same way)
Scenario: Valve Age and Service History
Repair considerations:
- Valve has less than 50% of expected service life remaining
- No history of repeated failures
- Root cause is clear and fixable
Replace when:
- Valve approaches or exceeds expected service life
- Multiple repairs have already been attempted
- Application is critical (downtime costs exceed replacement)
- Future parts availability is uncertain

Common Mistakes to Avoid When Diagnosing and Repairing Spool Valves
Proper diagnosis saves time and money. Avoid these common pitfalls that lead to repeat failures and unnecessary component replacement.
- Test spool valve leakage before replacing cylinder seals—internal valve leakage causes most drift issues
- Address root causes (contaminated fluid, inadequate filtration, pressure spikes) before installing replacement valve
- Use manufacturer-specified seal materials matched to your hydraulic fluid type and system pressure rating
- Validate repairs with leakage testing and actuator performance checks before returning equipment to service
Taking these precautions during diagnosis and repair prevents recurring failures and extends valve service life. When sourcing replacement seals or valve components, verify specifications match your system requirements exactly.
Preventive Measures to Avoid Future Spool Valve Problems
Preventive maintenance extends valve life, reduces unexpected failures, and maintains system performance—small investments in prevention avoid large repair costs.
Maintain Fluid Cleanliness Through Proper Filtration
- Install filters meeting system requirements (Beta ratio of β₁₀ ≥ 75 for general systems, β₁₀ ≥ 200 for critical systems)
- Change filters every 6-12 months or per manufacturer specifications
- Monitor filter differential pressure indicators
- Consider upgrading filtration if contamination-related failures occur
- Never assume new oil is clean—suppliers typically ship at ISO 21/19/16 and you must filter it before use
Conduct Regular Inspections
- Check for external leakage at valve seals and connections
- Monitor actuator performance for signs of drift or slow response
- Verify valve shifting response remains crisp
- Test fluid condition (visual inspection, laboratory analysis for wear metals and contamination)
Control Operating Conditions
- Avoid pressure spikes with proper relief valve sizing and accumulator placement
- Maintain fluid temperature within 40°C to 60°C range (104°F to 140°F)
- Use correct fluid viscosity for operating conditions
- Protect system from moisture entry with desiccant breathers
Source Quality Components
Component quality directly impacts long-term valve reliability. Use American-made parts from manufacturers who provide technical support and proper specifications.
Direct manufacturer sourcing ensures you receive the correct parts with expert guidance. For heavy machinery applications, HydraWolf Hydraulics manufactures components in-house and provides technical support from engineers who operate the same equipment you do.
Conclusion
Most spool valve leak problems can be diagnosed and fixed when approached systematically. Distinguishing between normal internal leakage (30-50% of supply pressure at blocked work ports) and excessive leakage forms the basis for accurate diagnosis.
Before attempting repair, complete proper diagnosis:
- Conduct pressure testing and measurement
- Assess contamination levels
- Verify actual failure mode
This approach prevents wasted effort replacing functional components.
When to repair versus replace depends on three factors: wear measurements, cost analysis, and reliability requirements. Making the right decision saves money and downtime while maintaining system safety and performance.
When replacement is the better option, sourcing quality components matters. HydraWolf Hydraulics manufactures American-made hydraulic valves and replacement parts designed for reliability in demanding applications—from firewood processors to construction equipment.
Frequently Asked Questions
How do you know if your spool valve is bad?
Watch for cylinder drift under load, slow actuator response, system pressure loss, external fluid leaks, sluggish valve shifting, or excessive heat. Confirm with pressure testing—readings above 50% of supply pressure at work ports indicate excessive internal leakage.
Can you operate equipment with a bad spool valve?
No. Operating with a failed spool valve creates serious safety hazards—cylinder drift causes unexpected movement and load drops, while contamination spreads to other components. Address issues immediately to prevent equipment damage and operator injury.
What causes excessive spool valve leakage?
Contaminated fluid causes 65-90% of failures by wearing down the clearance between moving parts. Other causes include normal wear from extended service, operating beyond design limits, and corrosion from moisture or incompatible fluids.
Is some leakage normal in spool valves?
Unlike poppet valves, spool valves have inherent internal leakage due to required radial clearance. In closed-center configurations, seeing 30-50% of supply pressure at blocked work ports is normal. Leakage exceeding 50% indicates excessive wear requiring attention.
Can spool valve leakage be repaired or does the valve need replacement?
External leakage from failed seals is readily repairable with seal replacement. Excessive internal leakage from worn spool/bore typically requires valve replacement (field repair not practical). Contamination-caused sticking is repairable through cleaning if no wear damage exists. Decision depends on specific failure mode and wear measurements.
How do you test for spool valve internal leakage?
Disconnect actuator lines, install gauges at work ports A and B, position valve in neutral, then pressurize the system. Work port pressure readings of 30-50% are normal; above 50% indicates excessive wear requiring replacement.