Introduction
Hydraulic systems power the heavy machinery that drives agriculture, construction, and industrial operations—but the connection points where hoses meet ports represent the highest risk for catastrophic failure.
Research shows that high-pressure injection injuries from pinhole leaks carry an amputation rate of 30% to 40%. Connecting a hydraulic hose may look straightforward, but rushing the process or skipping critical steps leads to costly downtime, equipment damage, and serious injury.
This guide covers the complete connection process from system depressurization through final verification. You'll learn the proper sequence, safety protocols, and verification methods that prevent the most common failures:
- Cross-threading
- Over-torquing
- Contamination
- Pressure-related incidents
Key Takeaways
- Depressurize completely and follow lockout/tagout before touching any connection
- Verify thread compatibility (JIC 37°, NPT, ORFS) and clean all sealing surfaces thoroughly
- Hand-tighten first to prevent cross-threading, then torque to manufacturer specifications using a torque wrench
- Apply thread sealant only to tapered NPT threads—never on JIC or ORFS fittings
- Re-pressurize gradually while monitoring for leaks from a safe distance
How to Connect Hydraulic Hoses
Step 1: Prepare the System and Workspace
The hydraulic system must be completely depressurized before touching any fitting. Modern hydraulic equipment can generate pressures up to 10,000 psi, ejecting fluid at 400 mph—capable of causing severe injection injuries.
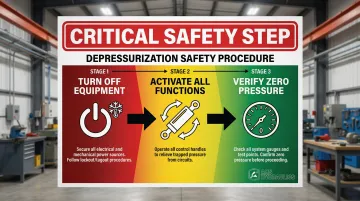
Depressurization procedure:
- Turn off the equipment and allow it to cool
- Activate all hydraulic functions to release residual pressure
- Verify zero pressure using a gauge before proceeding
Lockout/tagout (LOTO) requirements:
OSHA Standard 29 CFR 1910.147 mandates energy control for hydraulic systems. Simply turning off the machine is insufficient.
You must prevent accidental startup and verify that all stored energy is released.
- Place lockout devices on power sources
- Tag all controls with your name and date
- Verify isolation is complete before beginning work
Workspace setup:
- Clean, well-lit work surface free of dirt and debris
- All tools within arm's reach (torque wrench, backup wrenches, cleaning supplies)
- Spill containment materials ready for any fluid release
Required PPE:
- Safety glasses (protection from fluid spray)
- Chemical-resistant gloves (hydraulic fluid is a skin irritant)
- Long sleeves and protective clothing (barrier against high-pressure leaks)
Step 2: Inspect and Clean All Components
With the system safely depressurized, focus on component cleanliness. Contamination causes premature seal failure, and even microscopic particles can score sealing surfaces.
Visual inspection checklist:
- Examine hose ends for cracks, deformation, or damage
- Check fittings for burrs, nicks, or thread damage
- Inspect O-rings for cuts, hardening, or deterioration
- Look for corrosion on sealing surfaces
Cleaning procedure:
- Wipe threads and sealing surfaces with lint-free cloths
- Use approved hydraulic system cleaner or isopropyl alcohol
- Remove all dirt, metal shavings, and old sealant residue
- Never use shop rags that leave fibers
O-ring and seal inspection:
Replace O-rings if you see any of these conditions:
- Cuts, nicks, or tears
- Hardening or loss of elasticity
- Permanent compression set (flattened areas)
- Swelling or deterioration from fluid exposure
Replace questionable O-rings immediately. A $2 seal is cheaper than system failure.
Step 3: Verify Fitting Compatibility and Thread Type
After cleaning and inspection, verify fitting compatibility. Mismatched fittings cause connection failure—JIC 37° and SAE 45° fittings may have identical threads in sizes -02 through -10, but their different seat angles prevent proper sealing.
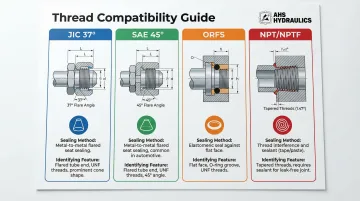
Common thread types:
| Thread Type | Sealing Method | Key Feature |
|---|---|---|
| JIC 37° | Metal-to-metal at 37° flare | Straight threads, 37° cone seat |
| SAE 45° | Metal-to-metal at 45° flare | Straight threads, 45° cone seat |
| ORFS | O-ring compression on flat face | Flat sealing surface with O-ring groove |
| NPT/NPTF | Thread deformation/interference | Tapered threads, no O-ring |
Compatibility verification:
- Use a thread gauge to identify thread pitch and type
- Match dash sizes between male and female components
- Verify seat angles align (37° to 37°, 45° to 45°)
- Confirm pressure ratings meet or exceed system requirements
HydraWolf stocks comprehensive fitting solutions including JIC, NPT, ORB (O-Ring Boss), and hose barb connectors in sizes #4 through #24, ensuring you have the correct adapter for any connection challenge.
Step 4: Hand-Tighten and Align the Connection
With compatible fittings selected, begin the connection process carefully. Cross-threading damages threads permanently—always start threads by hand to ensure proper alignment.
Proper hand-tightening technique:
- Hold the fitting between thumb and forefinger
- Start threads without forcing—they should turn smoothly
- If resistance occurs immediately, stop and check alignment
- Continue hand-tightening until finger-tight
Alignment for bent-tube and angled fittings:
- Plan the final orientation before tightening
- Align elbow and angle fittings to prevent hose twist
- Ensure hoses have adequate bend radius
- Check that routing avoids sharp edges and heat sources
Never use tools during initial engagement. If a fitting won't start by hand, something is wrong—forcing it with a wrench will damage the threads.
Step 5: Apply Proper Torque and Final Verification
Once hand-tightened, apply precise torque to complete the connection. Guesswork is dangerous—manufacturers specify exact torque ranges to prevent seat distortion and cracking.
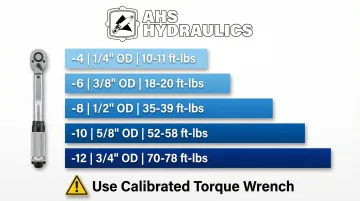
Torque specifications for steel JIC 37° fittings:
| Dash Size | Tube O.D. | Torque Range (ft-lbs) |
|---|---|---|
| -4 | 1/4" | 10–11 |
| -6 | 3/8" | 17–19 |
| -8 | 1/2" | 34–38 |
| -10 | 5/8" | 50–56 |
| -12 | 3/4" | 70–78 |
Proper wrench technique:
- Use a torque wrench on the fitting being tightened
- Position a backup wrench on the stationary component
- Apply torque smoothly—no jerking or impact
- Stop immediately when you reach the specified value
Thread sealant application:
CRITICAL: Thread sealant is prohibited on JIC 37°, SAE 45°, and ORFS fittings. These connections seal via metal-to-metal contact or O-ring compression, not thread interference.
Sealant prevents proper sealing and contaminates the system.
Use sealant only on NPT/NPTF tapered pipe threads:
- Apply 2-3 wraps of PTFE tape or liquid sealant
- Keep sealant away from the first 1-2 threads (prevents contamination)
- Tighten to torque specification
Final verification checklist:
- Visual inspection confirms proper alignment
- No gaps visible between mating surfaces
- Threads show no signs of cross-threading or damage
- Fitting orientation matches planned routing
When Should You Connect Hydraulic Hoses
Knowing when to connect or reconnect hydraulic hoses prevents downtime and ensures safe operation. Plan for hose connections in these scenarios:
- New machinery installation requires connecting all hydraulic circuits according to manufacturer specifications
- Replace hoses showing cracks, bulging, or external damage before catastrophic failure occurs—pressure cycling and abrasion degrade hoses over time
- Adding implements, cylinders, or hydraulic functions creates new connection points in your system
- Equipment serviced for winter storage or transported between job sites often needs lines disconnected and reconnected
- Interchangeable attachments on agricultural and construction equipment require frequent quick-disconnect coupling
What You Need Before Connecting Hydraulic Hoses
Tools and Equipment Requirements
Essential tools:
- Torque wrench with correct range for your fitting sizes
- Backup wrenches (typically 2-3 sizes to match common fittings)
- Thread identification gauge or pitch gauge
- Lint-free cleaning cloths
- Approved hydraulic system cleaner or isopropyl alcohol
Helpful additional tools:
- Hose clamps for securing routing
- Fitting adapters for compatibility issues
- Pressure gauge for verification testing
Component and Material Requirements
Replacement parts:
- O-rings in correct sizes and materials (Buna-N for petroleum-based fluids)
- Thread sealant (PTFE tape or liquid) for NPT connections only
- Lint-free cleaning cloths
HydraWolf offers seal kits like the PMCK-9700 Cylinder Seal Kit with O-rings in various sizes and materials, designed specifically for firewood processing equipment and heavy machinery applications.
Documentation:
- Manufacturer torque specifications for your specific fittings
- System pressure ratings and operating parameters
- Connection procedure diagrams or schematics
Safety and Environmental Readiness
PPE requirements:
- Safety glasses rated ANSI Z87.1 for impact and chemical splash
- Chemical-resistant gloves — nitrile or neoprene
- Long-sleeve shirt and long pants for fluid contact protection
- Steel-toe boots
Environmental preparation:
- Absorbent pads or drip pans for fluid capture
- Approved containers for hydraulic fluid disposal
- Fire extinguisher nearby
Key Safety Considerations When Connecting Hydraulic Hoses
Stored Pressure Hazards
The most dangerous assumption in hydraulic work is believing a system is depressurized when it isn't. Hydraulic systems store energy in accumulators, trapped fluid volumes, and compressed hoses even when the equipment is off.
Complete depressurization procedure:
- Verify pressure gauges read zero
- Cycle all hydraulic functions multiple times
- Wait for system cooldown (heat creates pressure)
- Use bleed valves to release trapped pressure
Injection Injury Risk
Once pressure is controlled, the next critical danger is injection injury. High-pressure hydraulic fluid can penetrate skin at pressures as low as 100 psi.
Modern systems operate at 3,000 psi or higher. The fluid penetrates deep into tissue, causing progressive damage that appears minor initially but leads to amputation in 30-40% of cases.
Prevention measures:
- Never use your hand to check for leaks
- Use cardboard or paper to detect spray
- Seek immediate medical attention for any injection injury, even if the wound appears minor
Body Positioning During Testing
When re-pressurizing a system after connection work, position yourself away from potential failure points.
Safe positioning:
- Stand to the side of hoses, not in line with ends
- Keep face and body away from connection points
- Have a clear path to emergency shutoff controls
- Never touch hoses or fittings during initial pressurization
Gradual Re-pressurization
Once you're properly positioned, the way you bring the system back online matters significantly. Bringing a system to full operating pressure instantly can cause sudden failures that gradual pressure increase would prevent.
Re-pressurization procedure:
- Increase pressure in 25% increments
- Monitor all new connections visually at each stage
- Listen for hissing or unusual sounds
- Stop immediately if any leak is detected
- Have an emergency shutdown plan ready

Common Mistakes When Connecting Hydraulic Hoses
Failing to Fully Depressurize
Consequences: Sudden fluid release under pressure can cause injection injuries, component damage, and uncontrolled hose whipping that strikes operators.
Prevention: Follow complete LOTO procedures, verify zero pressure on gauges, and cycle all functions before loosening any connection.
Cross-Threading Connections
How it happens: Forcing a fitting with a wrench before threads are properly engaged, misaligning components, or attempting to connect incompatible thread types.
Results: Damaged threads create leak paths that cannot be sealed. Over-tightening cross-threaded fittings can crack the fitting body, leading to catastrophic failure under pressure.
Prevention: Always start threads by hand. If resistance occurs immediately, stop and inspect rather than forcing the connection.
Improper Torque Application
Over-torquing damage:
- Crushed or extruded O-rings that no longer seal
- Fitting body cracks from excessive torque
- Distorted sealing surfaces that prevent metal-to-metal contact
Under-torquing problems:
- Weeping leaks at low pressure that become spray leaks under load
- Vibration-induced loosening over time
- Incomplete compression of O-rings in ORFS fittings
Solution: Use a calibrated torque wrench and follow manufacturer specifications exactly. Proper torque is critical for safety and performance in high-pressure systems.
Contamination Introduction
Sources of contamination:
- Dirty work environment with airborne dust
- Using shop rags that leave lint
- Skipping cleaning steps to save time
- Leaving hoses uncapped during storage
Impact: Particles score cylinder walls, damage pump components, and lodge in valve seats
- System-wide failure requires complete fluid flushing and component replacement
Prevention: Clean all components with lint-free cloths, work in a clean environment, and cap all openings immediately after disconnection.
Troubleshooting Connection Issues
Problem: Connection Leaks After Pressurization
Likely causes:
- Improper torque applied during assembly
- Damaged, missing, or incorrectly installed O-ring
- Incompatible thread types or seat angles
- Contamination preventing proper seal contact
- Cracked fitting from previous over-torquing
Step-by-step remedy:
- Depressurize the system completely and apply LOTO
- Disassemble and inspect both connection components
- Check threads for damage using a thread gauge
- Examine O-rings for cuts, hardening, or improper installation
- Clean all sealing surfaces and replace damaged components
- Reassemble using proper hand-starting technique
- Torque to specification with calibrated wrench
- Re-pressurize gradually while monitoring for leaks
Problem: Fitting Won't Thread or Feels Tight Immediately
Common causes include:
- Cross-threading from misalignment
- Wrong thread type (attempting to mate incompatible standards)
- Damaged threads with burrs or deformation
- Contamination (dirt, old sealant, or debris) in threads
Immediate action:
Stop forcing the connection immediately. Continuing will damage threads permanently.
- Back out the fitting completely
- Inspect threads on both male and female components
- Use a thread gauge to verify compatibility
- Clean threads thoroughly and remove any burrs
- Attempt hand-starting again with careful alignment
- If resistance continues, verify you have the correct fitting type
Problem: Hose Twists or Misaligns During Tightening
Common causes include:
- Improper orientation planning before tightening
- Not using backup wrench on stationary component
- Incompatible fitting angles for the application
- Attempting to compensate for incorrect hose length
Effective solutions:
Applications requiring specific hose orientation should use swivel-style fittings that allow the hose to rotate independently of the threaded connection.
Visualize the final hose routing and start the fitting in the correct rotational position so final torque brings it to proper alignment.
Always use a backup wrench on the stationary component (port or adapter body) while tightening the rotating component. This prevents the entire assembly from twisting.
HydraWolf offers 90-degree elbows, straight adapters, and specialty fittings to solve routing challenges without forcing hoses into unnatural positions.
Conclusion
Successful hydraulic hose connections depend on three fundamentals: proper preparation, component compatibility verification, and following correct procedures without shortcuts. Most connection failures stem from rushing the process—skipping the inspection step, forcing threads instead of verifying alignment, or guessing at torque values instead of using a calibrated wrench.
The time invested in proper connection techniques prevents costly consequences. A hydraulic system failure can halt operations for hours or days, damage expensive equipment, and create serious safety hazards.
Following the procedures in this guide—complete depressurization, thorough cleaning, compatibility verification, hand-starting threads, and proper torque application—ensures reliable, leak-free connections that perform safely under pressure.
Remember that hydraulic connections require ongoing attention. Regular inspection, leak monitoring, and proper maintenance extend system life and prevent unexpected failures. When you need replacement fittings, hoses, or hydraulic components, choosing quality American-made parts from manufacturers like HydraWolf Hydraulics ensures you're working with components designed for reliable performance under pressure.
Frequently Asked Questions
What happens if you hook up hydraulic lines backwards?
Reversed connections cause cylinders to move incorrectly, pumps to run backwards, and valves to direct flow to wrong ports. This creates dangerous pressure buildups in components not designed for reverse flow, potentially causing unexpected equipment movement that endangers operators.
How tight should hydraulic fittings be?
Always use a calibrated torque wrench to meet manufacturer specifications—for example, a -8 steel JIC fitting requires 34–38 ft-lbs. If specs are unavailable, hand-tight plus 1–2 turns works for JIC fittings, but torque measurement is more reliable.
Can you reuse hydraulic hose fittings?
Permanent crimped fittings cannot be reused—they must be cut off and replaced. Reusable field-attachable fittings can be reused if threads and sealing surfaces are undamaged, but replace all O-rings and seals. Never reuse fittings with cracks, deformation, or thread damage.
What causes hydraulic hose connections to leak?
Common causes include improper torque (over or under-tightening), damaged or missing O-rings, contamination on sealing surfaces, incompatible fitting types, vibration-induced loosening, and exceeding pressure or temperature ratings. Proper torque within specification prevents vibration-related fatigue and wear at sealing interfaces.
Do I need to use thread sealant on hydraulic fittings?
Use thread sealant only on tapered pipe threads (NPT/NPTF) where thread interference provides the seal. Never apply sealant to JIC 37°, SAE 45°, or ORFS fittings—these seal via metal-to-metal contact or O-ring compression, and sealant contaminates the system.
How do I know if my hydraulic connection is secure?
Verify security through visual inspection (proper alignment, no gaps), torque wrench confirmation of specifications, and gradual pressurization in 25% increments while monitoring for leaks from a safe distance. Never assume a connection is secure—always test systematically.